Introduction: Why Advanced Trading Strategies Matter
In today’s competitive trading landscape, success isn’t determined by luck or guesswork it’s built on structured methodologies, precise risk management, and a deep understanding of market dynamics.
Table of Contents
- Introduction: Why Advanced Trading Strategies Matter
- What is the ZAMCO ICT Strategy?
- Zamco ICT Strategy Source Code
- The Three Pillars of the ZAMCO ICT Strategy
- 1. Liquidity Sweeps: Finding Where Smart Money Hunts
- 2. Market Structure Shift (MSS): Confirming Directional Bias
- 3. Fair Value Gap (FVG): Identifying High-Probability Price Targets
- How the ZAMCO ICT Strategy Works: A Step-by-Step Guide
- Step 1: Analyze Higher Timeframe Bias
- Step 2: Identify Liquidity Sweeps on Your Working Timeframe
- Step 3: Wait for Market Structure Shift Confirmation
- Step 4: Confirm Entry with Fair Value Gap
- Step 5: Enter with Precise Risk Management
- Key Features of the ZAMCO ICT Strategy
- Minimalist, Professional Chart Design
- Customizable Parameters
- Automated Entry & Exit Signals
- Real-time Alerts
- HTF Bias Dashboard
- Best Practices for Using the ZAMCO ICT Strategy
- 1. Always Confirm All Three Conditions
- 2. Respect Your Risk-Reward Ratio
- 3. Use Session Awareness
- 4. Backtest Before Going Live
- Advantages of the ZAMCO ICT Strategy
- Limitations & Considerations
- Frequently Asked Questions (FAQ)
- Conclusion: Master the ZAMCO ICT Strategy for Consistent Trading Success
- Automate Your Trading with PickMyTrade
- Related Articles You May Like
The ZAMCO ICT Strategy represents the evolution of professional prop firm trading techniques, adapted for individual traders seeking to improve their win rate, reduce emotional decision-making, and identify high-confidence trading setups. Whether you’re trading forex, stocks, cryptocurrencies, or indices, this framework provides a systematic approach to reading price action and executing trades with conviction.
What is the ZAMCO ICT Strategy?
The ZAMCO ICT Strategy is a comprehensive trading framework that combines three core technical analysis components:
- Liquidity Sweeps – Identifying where smart money removes stop-losses and activates orders
- Market Structure Shifts (MSS) – Confirming directional bias and market momentum reversals
- Fair Value Gaps (FVG) – Recognizing price inefficiencies where price often returns to equilibrate
Combined with higher timeframe bias analysis and a disciplined risk-reward approach, the ZAMCO ICT Strategy creates a multi-layered confirmation system that significantly improves trading accuracy and execution quality.
Zamco ICT Strategy Source Code
// ============================================================
//  ZAMCO ICT Strategy [PickMyTrade]
//  Inspired by the prop firm trading methodology publicly
//  discussed by Zamco (ZAMCO Capital Ltd) — ICT Liquidity
//  Sweeps, Market Structure Shifts, and Fair Value Gaps.
//  Not affiliated with or endorsed by Zamco, ICT, or
//  Michael Huddleston. Educational purposes only.
// ============================================================

//@version=6
strategy("ZAMCO ICT Strategy [PickMyTrade]",
         shorttitle        = "ZAMCO ICT [PMT]",
         overlay           = true,
         default_qty_type  = strategy.percent_of_equity,
         default_qty_value = 1,
         initial_capital   = 10000,
         commission_type   = strategy.commission.percent,
         commission_value  = 0.01,
         max_boxes_count   = 200,
         max_lines_count   = 500,
         max_labels_count  = 200)

// ─────────────────────────────────────────────
//  INPUTS
// ─────────────────────────────────────────────
grp1 = "── Structure ──"
swingLen      = input.int(10, "Pivot Len", minval=3, maxval=50, group=grp1)

grp2 = "── Liquidity ──"
sweepWick     = input.float(0.3, "Min Sweep Wick %", minval=0.1, maxval=1.0, step=0.05, group=grp2)
showSweepDot  = input.bool(true, "Show Sweep Dots", group=grp2)

grp3 = "── FVG ──"
showFVG       = input.bool(true,  "Show FVG Zones",      group=grp3)
fvgMitigated  = input.bool(true,  "Hide Mitigated FVGs", group=grp3)
showFVGMid    = input.bool(true,  "Show CE Midline",      group=grp3)

grp4 = "── HTF Bias ──"
htfTF         = input.timeframe("60", "HTF Timeframe", group=grp4)

grp5 = "── Risk ──"
rrTarget      = input.float(3.0, "R:R Target", minval=1.0, maxval=20.0, step=0.5, group=grp5)
challengeMode = input.bool(false, "Challenge Mode", group=grp5)

// ─────────────────────────────────────────────
//  THEME PALETTE  (dark-optimised, Zeiierman style)
// ─────────────────────────────────────────────
c_bull        = #00e5ff   // cyan  — bullish structure
c_bear        = #ff1744   // red   — bearish structure
c_sweep_bull  = #ffea00   // yellow — bull sweep dot
c_sweep_bear  = #ff6d00   // orange — bear sweep dot
c_mss_bull    = #00e676   // green  — bull MSS line
c_mss_bear    = #ff1744   // red    — bear MSS line
c_fvg_bull    = color.new(#00e676, 88)
c_fvg_bear    = color.new(#ff1744, 88)
c_fvg_bull_b  = color.new(#00e676, 70)
c_fvg_bear_b  = color.new(#ff1744, 70)
c_sl          = color.new(#ff1744, 30)
c_tp          = color.new(#00e676, 30)
c_entry       = color.new(#ffffff, 60)
c_london      = color.new(#1565c0, 93)
c_ny          = color.new(#4a148c, 93)

// ─────────────────────────────────────────────
//  1. SWING STRUCTURE — dots only (no triangles)
// ─────────────────────────────────────────────
swingHigh = ta.pivothigh(high, swingLen, swingLen)
swingLow  = ta.pivotlow(low,  swingLen, swingLen)

var float lastSH = na
var float lastSL = na

if not na(swingHigh)
    lastSH := swingHigh
if not na(swingLow)
    lastSL := swingLow

// Tiny dots for swing H/L — clean Zeiierman look
plotshape(swingHigh, style=shape.circle, location=location.abovebar,
          color=color.new(c_bear, 30), size=size.tiny, offset=-swingLen, title="SH")
plotshape(swingLow,  style=shape.circle, location=location.belowbar,
          color=color.new(c_bull, 30), size=size.tiny, offset=-swingLen, title="SL")

// ─────────────────────────────────────────────
//  2. LIQUIDITY SWEEP — small diamond + thin dashed level line
// ─────────────────────────────────────────────
bullSweep = not na(lastSL) and low < lastSL and close > lastSL and (lastSL - low) / (high - low + 0.00001) >= sweepWick

bearSweep = not na(lastSH) and high > lastSH and close < lastSH and (high - lastSH) / (high - low + 0.00001) >= sweepWick

plotshape(showSweepDot and bullSweep, style=shape.diamond, location=location.belowbar,
          color=c_sweep_bull, size=size.small, title="Bull Sweep")
plotshape(showSweepDot and bearSweep, style=shape.diamond, location=location.abovebar,
          color=c_sweep_bear, size=size.small, title="Bear Sweep")

// Thin dashed line at swept level
if bullSweep
    line.new(bar_index - 1, lastSL, bar_index + 15, lastSL,
             color=color.new(c_sweep_bull, 50), style=line.style_dashed, width=1)

if bearSweep
    line.new(bar_index - 1, lastSH, bar_index + 15, lastSH,
             color=color.new(c_sweep_bear, 50), style=line.style_dashed, width=1)

// ─────────────────────────────────────────────
//  3. MARKET STRUCTURE SHIFT — thin solid line + small arrow
// ─────────────────────────────────────────────
var bool  waitBull   = false
var bool  waitBear   = false
var float mssLvlBull = na
var float mssLvlBear = na

if bullSweep
    waitBull   := true
    mssLvlBull := lastSH

if bearSweep
    waitBear   := true
    mssLvlBear := lastSL

bullMSS = waitBull and not na(mssLvlBull) and close > mssLvlBull
bearMSS = waitBear and not na(mssLvlBear) and close < mssLvlBear

if bullMSS
    waitBull := false
    // Thin solid MSS line
    line.new(bar_index - 5, mssLvlBull, bar_index + 20, mssLvlBull,
             color=color.new(c_mss_bull, 20), style=line.style_solid, width=1)
    // Small label — Zeiierman uses tiny text tags, not large boxes
    label.new(bar_index, mssLvlBull, " MSS",
              color=color.new(c_mss_bull, 85), textcolor=c_mss_bull,
              style=label.style_label_right, size=size.tiny)

if bearMSS
    waitBear := false
    line.new(bar_index - 5, mssLvlBear, bar_index + 20, mssLvlBear,
             color=color.new(c_mss_bear, 20), style=line.style_solid, width=1)
    label.new(bar_index, mssLvlBear, " MSS",
              color=color.new(c_mss_bear, 85), textcolor=c_mss_bear,
              style=label.style_label_right, size=size.tiny)

// ─────────────────────────────────────────────
//  4. FAIR VALUE GAP — semi-transparent zone + CE midline
// ─────────────────────────────────────────────
bullFVG = low  > high[2]
bearFVG = high < low[2]

var box[]  fvgBoxes   = array.new_box()
var line[] fvgMidlines= array.new_line()
var bool[] fvgIsBull  = array.new_bool()

if showFVG and bullFVG
    fTop = low
    fBot = high[2]
    fMid = math.avg(fTop, fBot)
    b = box.new(left=bar_index - 2, top=fTop, right=bar_index + 40, bottom=fBot,
                bgcolor=c_fvg_bull, border_color=c_fvg_bull_b, border_width=1)
    ml = showFVGMid ? line.new(bar_index - 2, fMid, bar_index + 40, fMid,
                               color=color.new(#00e676, 55), style=line.style_dotted, width=1) :
                      line.new(0, 0, 0, 0, color=color.new(color.white,100))
    array.push(fvgBoxes,    b)
    array.push(fvgMidlines, ml)
    array.push(fvgIsBull,   true)

if showFVG and bearFVG
    fTop = low[2]
    fBot = high
    fMid = math.avg(fTop, fBot)
    b = box.new(left=bar_index - 2, top=fTop, right=bar_index + 40, bottom=fBot,
                bgcolor=c_fvg_bear, border_color=c_fvg_bear_b, border_width=1)
    ml = showFVGMid ? line.new(bar_index - 2, fMid, bar_index + 40, fMid,
                               color=color.new(#ff1744, 55), style=line.style_dotted, width=1) :
                      line.new(0, 0, 0, 0, color=color.new(color.white,100))
    array.push(fvgBoxes,    b)
    array.push(fvgMidlines, ml)
    array.push(fvgIsBull,   false)

// Mitigate FVGs
if fvgMitigated and array.size(fvgBoxes) > 0
    for i = array.size(fvgBoxes) - 1 to 0
        b      = array.get(fvgBoxes,    i)
        ml     = array.get(fvgMidlines, i)
        isBull = array.get(fvgIsBull,   i)
        bTop   = box.get_top(b)
        bBot   = box.get_bottom(b)
        if isBull and low <= bTop
            box.delete(b)
            line.delete(ml)
            array.remove(fvgBoxes,    i)
            array.remove(fvgMidlines, i)
            array.remove(fvgIsBull,   i)
        else if not isBull and high >= bBot
            box.delete(b)
            line.delete(ml)
            array.remove(fvgBoxes,    i)
            array.remove(fvgMidlines, i)
            array.remove(fvgIsBull,   i)

// ─────────────────────────────────────────────
//  5. HTF BIAS — coloured candles + slim EMA ribbon
// ─────────────────────────────────────────────
htfEMA50  = request.security(syminfo.tickerid, htfTF, ta.ema(close, 50),  lookahead=barmerge.lookahead_off)
htfEMA200 = request.security(syminfo.tickerid, htfTF, ta.ema(close, 200), lookahead=barmerge.lookahead_off)
htfBull   = htfEMA50 > htfEMA200
htfLabelY = ta.highest(high, 50)

// Slim EMA lines on chart
plot(htfEMA50,  "HTF EMA50",  color=color.new(c_bull, 40), linewidth=1, style=plot.style_line)
plot(htfEMA200, "HTF EMA200", color=color.new(c_bear, 40), linewidth=1, style=plot.style_line)

// Bias tag — right side, tiny
if barstate.islast
    label.new(bar_index + 2, htfLabelY,
              htfBull ? "▲ BULL" : "▼ BEAR",
              color=color.new(htfBull ? c_mss_bull : c_mss_bear, 80),
              textcolor=htfBull ? c_mss_bull : c_mss_bear,
              style=label.style_label_left, size=size.small)

// ─────────────────────────────────────────────
//  6. ENTRY SIGNALS
// ─────────────────────────────────────────────
longSig  = htfBull      and bullMSS
shortSig = not htfBull  and bearMSS

// Small triangle signals (not plotshape large boxes)
plotshape(longSig,  style=shape.triangleup,   location=location.belowbar,
          color=c_mss_bull, size=size.small, title="Long Signal")
plotshape(shortSig, style=shape.triangledown, location=location.abovebar,
          color=c_mss_bear, size=size.small, title="Short Signal")

// ─────────────────────────────────────────────
//  7. ENTRIES + CLEAN SL/TP ZONES
// ─────────────────────────────────────────────
if longSig and strategy.position_size == 0
    stopD  = close - lastSL * 0.9998
    slL    = close - stopD
    tpL    = close + stopD * rrTarget
    strategy.entry("Long",  strategy.long,  comment="L")
    strategy.exit("LX", "Long",  stop=slL, limit=tpL)

    // SL zone — thin red shaded box
    box.new(left=bar_index, top=close, right=bar_index + 50, bottom=slL,
            bgcolor=color.new(c_bear, 88), border_color=color.new(c_bear, 60), border_width=1)
    // TP zone — thin green shaded box
    box.new(left=bar_index, top=tpL, right=bar_index + 50, bottom=close,
            bgcolor=color.new(c_mss_bull, 88), border_color=color.new(c_mss_bull, 60), border_width=1)
    // Entry line
    line.new(bar_index, close, bar_index + 50, close,
             color=color.new(c_entry, 20), style=line.style_dotted, width=1)
    // SL / TP price tags — tiny right-side labels
    label.new(bar_index + 50, slL, " SL " + str.tostring(slL, "#.##"),
              color=color.new(c_bear, 80), textcolor=c_bear,
              style=label.style_label_left, size=size.tiny)
    label.new(bar_index + 50, tpL, " TP " + str.tostring(tpL, "#.##"),
              color=color.new(c_mss_bull, 80), textcolor=c_mss_bull,
              style=label.style_label_left, size=size.tiny)
    label.new(bar_index + 50, close, " E " + str.tostring(close, "#.##"),
              color=color.new(color.white, 85), textcolor=color.white,
              style=label.style_label_left, size=size.tiny)

if shortSig and strategy.position_size == 0
    stopD  = lastSH * 1.0002 - close
    slS    = close + stopD
    tpS    = close - stopD * rrTarget
    strategy.entry("Short", strategy.short, comment="S")
    strategy.exit("SX", "Short", stop=slS, limit=tpS)

    box.new(left=bar_index, top=slS,   right=bar_index + 50, bottom=close,
            bgcolor=color.new(c_bear, 88), border_color=color.new(c_bear, 60), border_width=1)
    box.new(left=bar_index, top=close, right=bar_index + 50, bottom=tpS,
            bgcolor=color.new(c_mss_bull, 88), border_color=color.new(c_mss_bull, 60), border_width=1)
    line.new(bar_index, close, bar_index + 50, close,
             color=color.new(c_entry, 20), style=line.style_dotted, width=1)
    label.new(bar_index + 50, slS, " SL " + str.tostring(slS, "#.##"),
              color=color.new(c_bear, 80), textcolor=c_bear,
              style=label.style_label_left, size=size.tiny)
    label.new(bar_index + 50, tpS, " TP " + str.tostring(tpS, "#.##"),
              color=color.new(c_mss_bull, 80), textcolor=c_mss_bull,
              style=label.style_label_left, size=size.tiny)
    label.new(bar_index + 50, close, " E " + str.tostring(close, "#.##"),
              color=color.new(color.white, 85), textcolor=color.white,
              style=label.style_label_left, size=size.tiny)

// ─────────────────────────────────────────────
//  8. SESSION SHADING — very subtle
// ─────────────────────────────────────────────
londonSess = time(timeframe.period, "0800-1200", "Europe/London")
nySess     = time(timeframe.period, "1330-1700", "America/New_York")
bgcolor(not na(londonSess) ? c_london : na, title="London")
bgcolor(not na(nySess)     ? c_ny     : na, title="NY")

// ─────────────────────────────────────────────
//  9. ALERTS
// ─────────────────────────────────────────────
if longSig
    alert("ZAMCO ICT LONG — " + syminfo.ticker + " " + timeframe.period, alert.freq_once_per_bar)
if shortSig
    alert("ZAMCO ICT SHORT — " + syminfo.ticker + " " + timeframe.period, alert.freq_once_per_bar)
if bullSweep or bearSweep
    alert("ZAMCO ICT Sweep — " + syminfo.ticker + " " + timeframe.period, alert.freq_once_per_bar)

// ─────────────────────────────────────────────
//  10. MINIMAL DASHBOARD — Zeiierman style (small, top-right)
// ─────────────────────────────────────────────
if barstate.islast
    var table t = table.new(position.top_right, 2, 5,
                            bgcolor=color.new(#0d0d0d, 20),
                            border_color=color.new(color.gray, 70),
                            border_width=1,
                            frame_color=color.new(color.gray, 60),
                            frame_width=1)

    table.cell(t, 0, 0, "ZAMCO ICT", text_color=color.new(color.white, 20), text_size=size.small,
               bgcolor=color.new(#0d0d0d, 10), text_halign=text.align_center)
    table.cell(t, 1, 0, "[PickMyTrade]", text_color=#00e5ff, text_size=size.tiny,
               bgcolor=color.new(#0d0d0d, 10), text_halign=text.align_center)

    table.cell(t, 0, 1, "Bias",   text_color=color.new(color.gray, 30), text_size=size.tiny)
    table.cell(t, 1, 1, htfBull ? "BULL" : "BEAR",
               text_color=htfBull ? c_mss_bull : c_mss_bear,            text_size=size.tiny)

    table.cell(t, 0, 2, "EMA50",  text_color=color.new(color.gray, 30), text_size=size.tiny)
    table.cell(t, 1, 2, str.tostring(htfEMA50,  "#.##"), text_color=color.white, text_size=size.tiny)

    table.cell(t, 0, 3, "EMA200", text_color=color.new(color.gray, 30), text_size=size.tiny)
    table.cell(t, 1, 3, str.tostring(htfEMA200, "#.##"), text_color=color.white, text_size=size.tiny)

    table.cell(t, 0, 4, "Mode",   text_color=color.new(color.gray, 30), text_size=size.tiny)
    table.cell(t, 1, 4, challengeMode ? "CHAL" : "FUND",
               text_color=challengeMode ? #ff6d00 : c_mss_bull,         text_size=size.tiny)
The Three Pillars of the ZAMCO ICT Strategy
1. Liquidity Sweeps: Finding Where Smart Money Hunts

A liquidity sweep occurs when price momentarily breaks past a recent swing high or swing low, removing retail stop-losses and triggering pending orders, before reversing sharply in the opposite direction.
Key Points:
- Sweeps represent institutional order flow activation—the point where smart money enters or exits with force
- Bullish sweeps occur below a swing low; bearish sweeps occur above a swing high
- The ZAMCO ICT Strategy identifies sweeps with a customizable ‘Min Sweep Wick %’ parameter (default 0.3), ensuring only valid, significant sweeps are flagged
- Sweeps are marked visually on charts with diamond-shaped dots, making them easy to spot and analyze
2. Market Structure Shift (MSS): Confirming Directional Bias
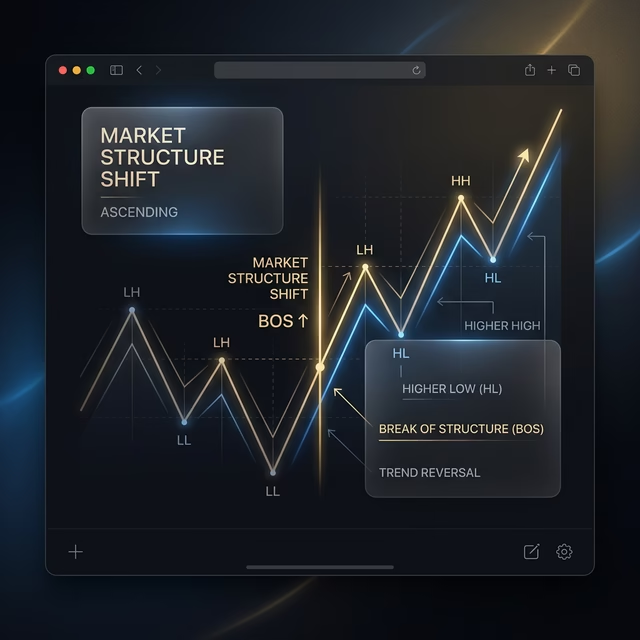
After a liquidity sweep, the next critical confirmation is a Market Structure Shift. An MSS signals that the market is no longer respecting the previous swing level, indicating a genuine change in direction.
How MSS Works:
- Following a bullish sweep below a swing low, the market must close above the previous swing high to confirm a bullish MSS
- Following a bearish sweep above a swing high, the market must close below the previous swing low to confirm a bearish MSS
- MSS acts as a filter, eliminating false signals and confirming only genuine directional intentions
3. Fair Value Gap (FVG): Identifying High-Probability Price Targets
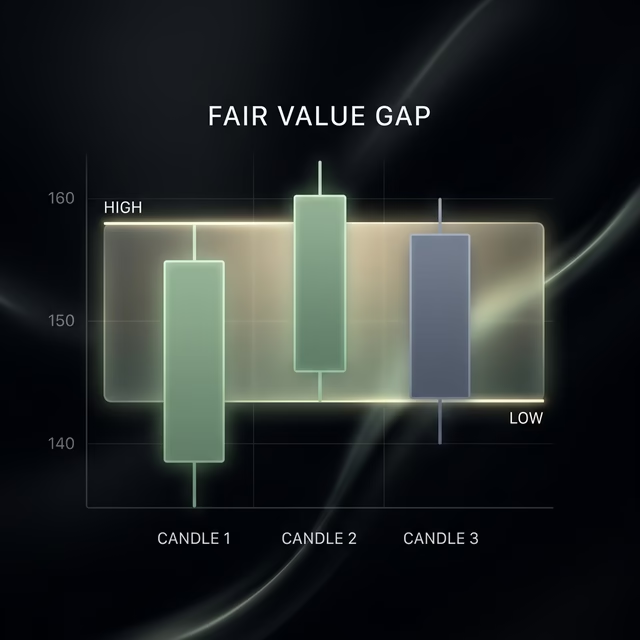
A Fair Value Gap is a zone of price inefficiency a gap where price jumped past a previous candle without trading through the middle. Markets naturally gravitate back to equilibrate these gaps.
FVG Mechanics:
- Bullish FVG: Forms when the current low is higher than the high two candles ago (price jumped up without filling the gap)
- Bearish FVG: Forms when the current high is lower than the low two candles ago (price jumped down without filling the gap)
- The strategy automatically detects and highlights FVGs on your chart with semi-transparent zones, making it simple to identify potential support and resistance levels
How the ZAMCO ICT Strategy Works: A Step-by-Step Guide
Step 1: Analyze Higher Timeframe Bias
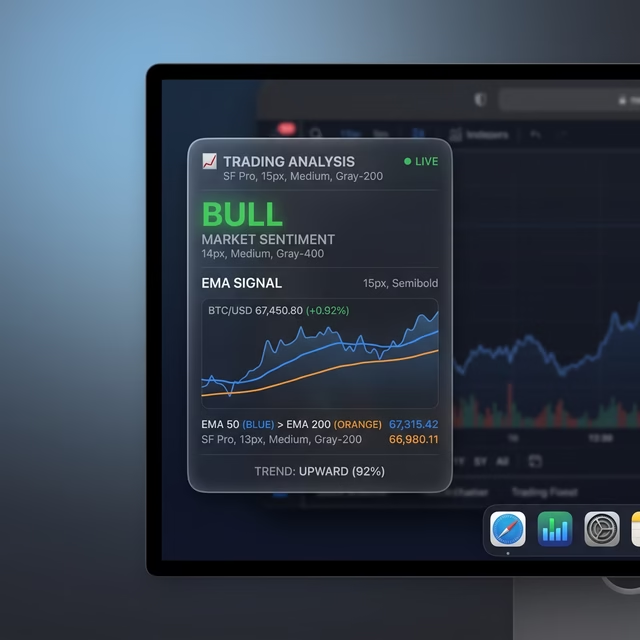
The first step is to establish your directional bias using a higher timeframe (default: 60-minute chart). The strategy uses two key EMAs:
- 50-period EMA (short-term trend)
- 200-period EMA (long-term trend)
When EMA50 > EMA200, the bias is BULLISH. When EMA50 < EMA200, the bias is BEARISH. This filter ensures you’re trading with the broader trend, not against it.
Step 2: Identify Liquidity Sweeps on Your Working Timeframe
On your lower timeframe chart (e.g., 5-min, 15-min), watch for swing highs and lows. When price breaks through a recent swing level with a clean wick and reverses, you’ve identified a liquidity sweep.
Step 3: Wait for Market Structure Shift Confirmation
After a sweep, wait for the market structure shift. In a bullish scenario:
- Price must close above the swing high that preceded the sweep
This confirms the sweep was genuine and the market is ready to move in your intended direction.
Step 4: Confirm Entry with Fair Value Gap
When HTF bias aligns with MSS, identify nearby FVGs as:
• Additional confirmation zones
• Potential pullback entry points
• Stop-loss placement references
Step 5: Enter with Precise Risk Management
With all three conditions confirmed (HTF Bias + Sweep + MSS), execute your entry at market. The strategy automatically calculates:
- Stop-loss placement (typically at the sweep level or recent swing)
- Risk distance (from entry to stop-loss)
- Take-profit targets (multiplied by R:R ratio, default 3:1)
Key Features of the ZAMCO ICT Strategy
Minimalist, Professional Chart Design
Inspired by Zeiierman’s clean aesthetic, the strategy uses:
• Tiny dots for swing structure (not bulky triangles)
• Semi-transparent zones for FVGs (not distracting boxes)
• Subtle session backgrounds (London & NY sessions)
• Small, readable labels and price tags
Customizable Parameters
Every aspect of the strategy is adjustable:
• Pivot length for swing structure
• Minimum sweep wick percentage
• Higher timeframe selection
• Risk-reward target (R:R)
• FVG mitigation (auto-remove filled gaps)
• Challenge mode for advanced traders
Automated Entry & Exit Signals
The strategy automatically executes entries when all conditions align and calculates precise stop-loss and take-profit levels, eliminating guesswork and emotional bias.
Real-time Alerts
Receive instant notifications when:
• Liquidity sweeps are identified
• Market structure shifts occur
• Entry signals are triggered
HTF Bias Dashboard
A compact dashboard displays your current bias (BULL/BEAR), EMA values, and trading mode—everything at a glance without clutter.
Best Practices for Using the ZAMCO ICT Strategy
1. Always Confirm All Three Conditions
Never trade a sweep without MSS confirmation. Never trade an MSS without HTF bias alignment. This three-layer confirmation system is the backbone of the strategy’s reliability.
2. Respect Your Risk-Reward Ratio
The default R:R of 3:1 ensures your profitable trades cover losses from losing trades. Adjust only if you have backtested evidence supporting different ratios.
3. Use Session Awareness
The London and New York sessions are marked for context. Volatility and liquidity vary across sessions—adjust your position sizing accordingly.
4. Backtest Before Going Live
Use the strategy’s customizable parameters to backtest on historical data. Understand the strategy’s win rate, average win/loss sizes, and drawdown on your specific markets before risking real capital.
Advantages of the ZAMCO ICT Strategy
- Rules-Based Execution: No guesswork. Every signal is defined by objective technical criteria.
- Reduced Emotional Trading: Automated entries and exits eliminate emotional decision-making.
- Multi-Market Applicability: Works on forex, stocks, indices, and cryptocurrencies.
- Higher Win Rate Potential: Three-layer confirmation system filters out low-probability setups.
- Professional-Grade Risk Management: Automatic R:R calculations ensure disciplined position sizing.
Limitations & Considerations
- Learning Curve: New traders may require time to understand swing structure, sweeps, and MSS concepts.
- Market-Dependent Performance: Like all technical strategies, performance varies across asset classes, timeframes, and market conditions.
- Not a ‘Set & Forget’ System: Active monitoring and adaptation to changing market conditions are required.
- Past Performance ≠ Future Results: Backtesting success doesn’t guarantee live trading results.
Frequently Asked Questions (FAQ)
Q: What timeframe should I use for the ZAMCO ICT Strategy?
A: Use a higher timeframe (60-min, 4-hour) for bias confirmation and a lower timeframe (5-min, 15-min) for entries. The default HTF timeframe is 60 minutes, adjustable in settings.
Q: What is the ideal R:R ratio for this strategy?
A: The default 3:1 ratio (risk $1 to make $3) provides solid risk-reward balance. Adjust based on your backtesting results and market conditions.
Q: Can I use the ZAMCO ICT Strategy on crypto?
A: Yes. The strategy works on any liquid market—crypto, forex, stocks, or indices. The underlying principles of liquidity sweeps and market structure remain consistent.
Q: How do I know if my sweep is valid?
A: The strategy flags sweeps based on your ‘Min Sweep Wick %’ setting. A valid sweep should show clear price rejection (a wick) beyond a swing level, followed by a strong reversal.
Q: What should I do if no setups appear on my chart?
A: Not all market conditions produce clear setups—that’s by design. The strategy prioritizes quality over quantity. Wait patiently for your confirmations rather than forcing trades.
Conclusion: Master the ZAMCO ICT Strategy for Consistent Trading Success
The ZAMCO ICT Strategy represents a significant evolution in technical analysis education. By combining institutional-grade concepts—liquidity sweeps, market structure shifts, and fair value gaps—with automated execution and risk management, it provides individual traders with tools once reserved for prop firms.
Whether you’re a beginner seeking a structured approach or an experienced trader looking to refine your edge, the strategy’s three-layer confirmation system, minimalist design, and customizable parameters make it an invaluable addition to your trading toolkit.
The path to consistent profitability isn’t about having the most indicators or the flashiest system—it’s about understanding price action, managing risk with discipline, and executing with precision. The ZAMCO ICT Strategy delivers all three.
Ready to elevate your trading? Start by paper trading the ZAMCO ICT Strategy, backtest it on your preferred markets, and gradually build confidence in the signals. The traders who succeed aren’t those with the best luck—they’re those with the best systems and the discipline to follow them.
Automate Your Trading with PickMyTrade
For Stock, Crypto, Futures, and Options: Visit pickmytrade.io to automate your trading across multiple brokers:
- Rithmic
- TradeStation
- TradeLocker
- Interactive Brokers
- ProjectX
- Matchtrader
- Bybit
- Binance
For Tradovate Users: Visit pickmytrade.trade for seamless Tradovate broker integration
Transform your TradingView strategies into fully automated trading systems with real-time execution. No more manual order entry, no more missed signals.
Related Articles You May Like
- Fabio Valentini Pro Scalper: Advanced Order Flow Trading Strategy for NASDAQ Scalping
- Correlation-Based Strategy: Ultimate Guide to Smart Diversification
- Advanced TradingView Indicator Template: Backtest Any Signal as a Professional Strategy
- Why TradingView Strategy Automation Matters in 2026
- Discover TradingView Paper Trading: Your Gateway to Risk-Free Strategy Mastery
- Trendline Breakout Strategy: How We Turned an Open-Source Trend Script into a Professional Long-Only System