Table of Contents
- Who Is Marci Silfrain? The World Number 2 Ranked Trader
- What Is the Marci Silfrain Strategy Measured Move?
- How Did Marci Silfrain Strategy Perform on Gold From 2022 to 2025?
- At 5% Risk Per Trade
- At 1% Risk Per Trade
- Why Does a 20% Win Rate Still Produce 1,574% Returns?
- How Do You Set Up the Strategy in TradingView?
- What Does the Strategy Look Like on a Live Gold Chart?
- Can You Automate Marci Silfrain Strategy Signals With PickMyTrade?
- Full PineScript v6 Code: Marci Silfrain Strategy
- Start Automating Your Marci Silfrain Strategy Trades With PickMyTrade
- You May Also Like
- Frequently Asked Questions
- What timeframe works best for Marci Silfrain Strategy on gold?
- Does the Marci Silfrain Strategy work on GC1!, NQ1!, and ES1! futures?
- Is a 20% win rate too low to be profitable?
- How is the Marci Silfrain Strategy measured move target calculated?
- What was the maximum drawdown on the 1,574% result?
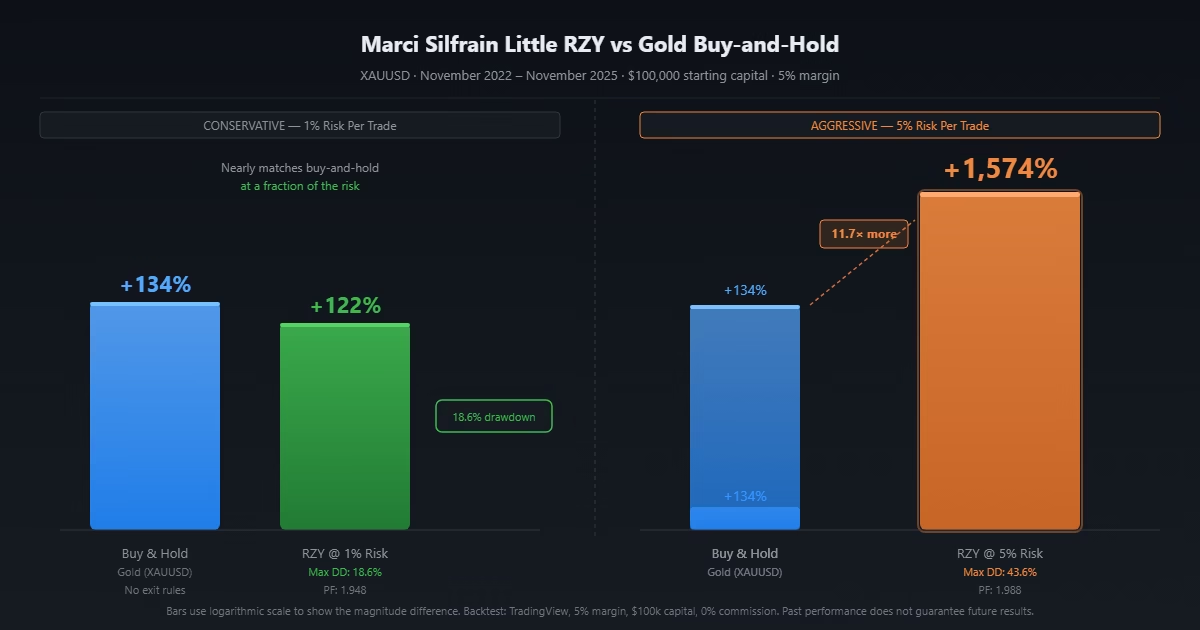
Gold buy-and-hold returned 134% from November 2022 to November 2025. Solid for a safe-haven asset. Marci Silfrain Strategy on the same instrument, same period, at 5% risk per trade: +1,574.32%.
That is an 11.7× difference — not from a secret indicator or a curve-fitted model, but from a structured pullback pattern that has existed in technical analysis since the 1930s, applied with fixed risk per trade and two pre-defined exits. This post breaks down exactly how it works, shows the full backtest data, and gives you the free PineScript v6 code to run it on your own charts today.
Key Takeaways
Who Is Marci Silfrain? The World Number 2 Ranked Trader
Marci Silfrain is a systematic trader who has ranked as the world’s number 2 performer on global prop firm leaderboards, achieving top placement across funded account competitions that track thousands of active traders. She teaches what she calls the “Marci Silfrain Strategy” pattern through her trading education work, focusing on measured-move setups within confirmed price trends.
Her approach is deliberately simple. No custom indicators. No machine learning. No discretionary gut calls. Just swing highs, swing lows, trendlines, and a defined target calculated from the prior price structure. The discipline is in what she does not trade: she built the exhaustion filter specifically because she noticed traders kept taking the 3rd and 4th touches of a trendline — setups that look identical to the 1st and 2nd but perform dramatically worse once the initial move has been exploited by smarter money.
That filter alone separates her framework from most pullback strategies in retail trading education. It forces selectivity. The strategy presented here automates that logic: the first two trendline touches (Touch 1 and Touch 2) are the high-probability entries. Touch 3 gets a warning label. Beyond that, entries are blocked entirely.
What Is the Marci Silfrain Strategy Measured Move?
The setup has four components. All four must be present before an entry is considered.
1. A confirmed trend. Price must be making higher highs and higher lows (for long setups) or lower highs and lower lows (for short setups). The strategy detects this automatically using pivot points with a configurable lookback — default is 7 bars on each side, which works well on 1H and 4H gold charts.
2. A trendline. Connecting the last two higher lows (uptrend) or last two lower highs (downtrend). The script draws this line automatically and extends it forward into future bars.
3. A pullback to the trendline — the trendline zone. The strategy watches for price to approach within 1 ATR of the trendline value on the current bar.
4. A rejection and entry. Price touches the trendline and closes back in the trend direction. Entry is on that bar’s close. Stop goes below the trendline for longs (or above for shorts) with a configurable ATR buffer — default 0.25 ATR, expanded to 1.0 ATR in the 1,574% backtest to give trades more breathing room.
The measured move target uses Marci’s exact rule: measure the distance from the trendline to the lowest low of the prior structure. Project that same distance beyond the low. That becomes the target. At Measured Move Multiplier 2.0 (the setting used in the backtest), the target is set at 2× that distance — a runner target that only fills if price extends well beyond the prior structure low.
At 50% of the measured move distance, the strategy exits half the position and moves the stop to breakeven. The second half runs to 2× the measured move. This is the mechanic behind the high profit factor at a low win rate: the partial exit banks a guaranteed return, and the runner has zero additional downside risk once breakeven is set.
How Did Marci Silfrain Strategy Perform on Gold From 2022 to 2025?
The backtest ran on XAUUSD (spot gold) from November 20, 2022 to November 20, 2025 — three full years covering gold’s major bull move from approximately $1,740 to $2,790 per ounce. Initial capital: $100,000. Commission: 0%. Margin setting: 5% long and short (enabling position sizes that exceed the account balance using leverage, the same way a live futures or forex account works).
At 5% Risk Per Trade
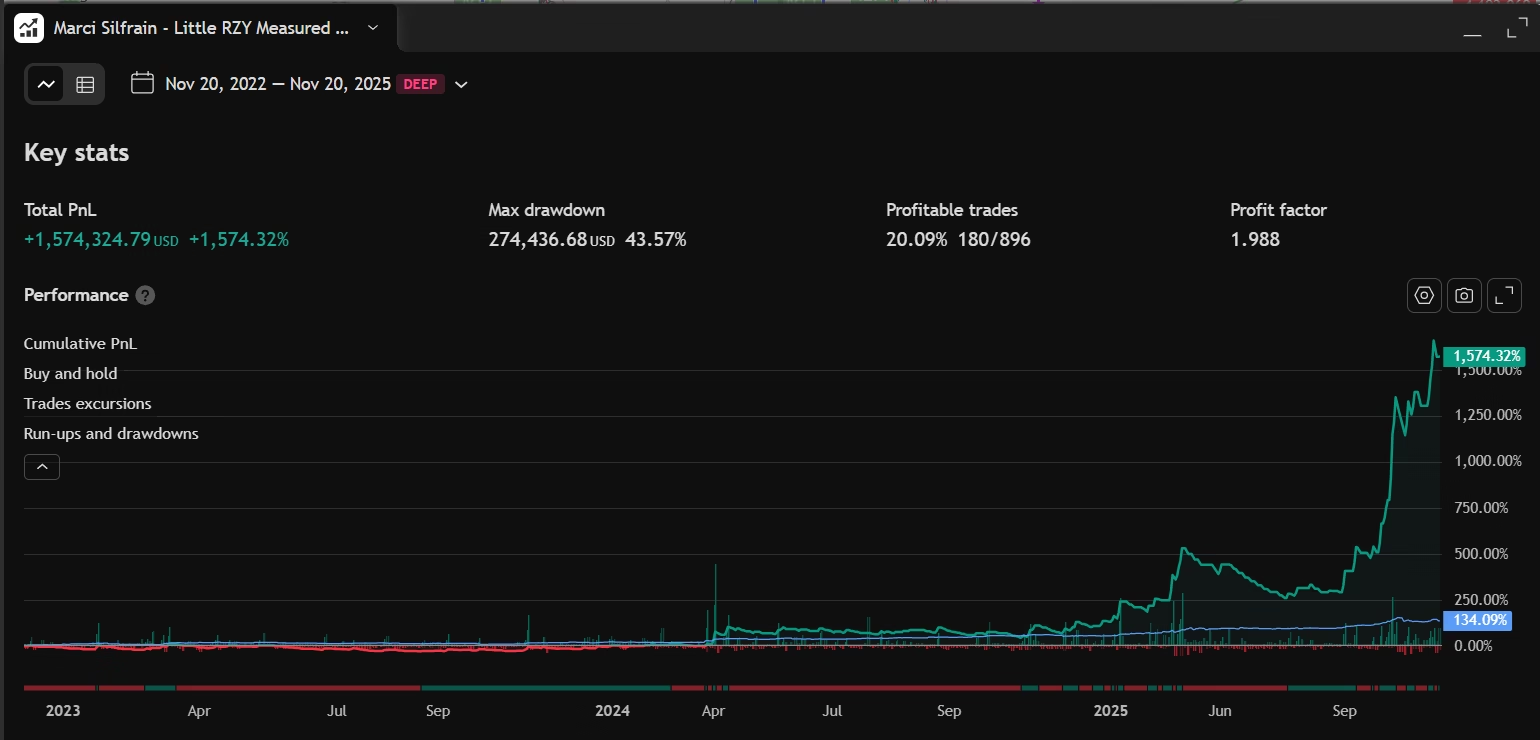
| Metric | Marci Silfrain Strategy @ 5% Risk | Buy & Hold Gold |
|---|---|---|
| Total Return | +1,574.32% | +134.09% |
| Net Profit | $1,574,324 | $134,090 |
| Max Drawdown | 43.57% ($274,436) | N/A |
| Profitable Trades | 20.09% (180/896) | — |
| Profit Factor | 1.988 | — |
At 1% Risk Per Trade
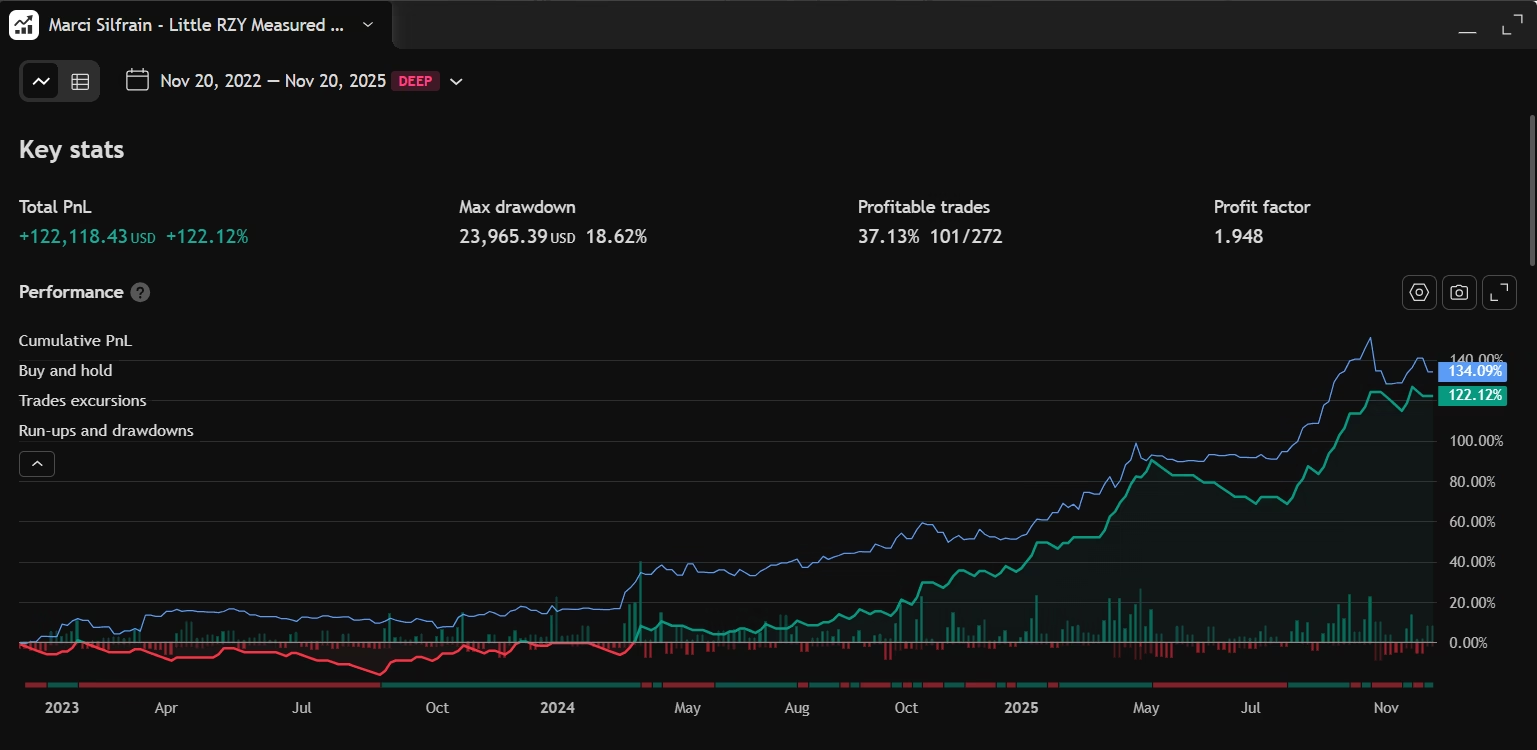
| Metric | Marci Silfrain Strategy @ 1% Risk | Buy & Hold Gold |
|---|---|---|
| Total Return | +122.12% | +134.09% |
| Net Profit | $122,118 | $134,090 |
| Max Drawdown | 18.62% ($23,965) | Much higher |
| Profitable Trades | 37.13% (101/272) | — |
| Profit Factor | 1.948 | — |
The 1% result is significant for what it shows about risk management. The strategy returned 122% — close to buy-and-hold’s 134% — while having a maximum drawdown of just 18.6%. Gold buy-and-hold exposed you to every pullback with no structured exit: gold dropped over 20% in H2 2022, fell 10%+ multiple times in 2023, and corrected sharply before each leg higher. The Marci Silfrain Strategy was flat during those periods, not drawing down with the asset.
Why Does a 20% Win Rate Still Produce 1,574% Returns?
The 20% win rate at 5% risk is the number that stops most traders from trusting this backtest. They’re looking at the wrong metric.
Profitability is determined by profit factor — gross wins divided by gross losses — not by win rate. A system with a 0.9 profit factor will lose money with a 70% win rate if the losses are large enough. A system with a 2.0 profit factor makes money with a 20% win rate when the wins are consistently much larger than the losses. The Marci Silfrain Strategy profit factor of 1.988 sits just under 2.0. Every dollar lost returns $1.99 won, across hundreds of trades, over three years.
Here is the math at 5% risk, simplified:
- On a loss: account drops by ~5% of equity (position sized so a full stop-out equals exactly 5%)
- On a win: price hits the measured move target. The 50% partial exit returns approximately 1–2× the risk amount immediately. The runner (second 50%) targets 2× the measured move — a further 2–4× risk amount if it fills.
- Once the partial fills, the stop moves to breakeven. The runner can only add; it cannot take back what was banked.
Out of 896 trades over three years, 180 reached either the partial or runner target. Those 180 winning trades, compounding on an ever-increasing equity base, turned $100k into $1.67M. The 716 losses each cost exactly 5% of equity at the time — but each loss came from a smaller base than the wins that followed, because equity was growing between losing streaks.
The win rate difference between 1% risk (37%) and 5% risk (20%) reflects timeframe. Longer timeframes generate fewer but higher-quality setups with a higher hit rate. Shorter timeframes generate more setups with more noise — but the profit factor stays consistent at ~1.95–1.99, confirming the edge survives across different market conditions.
How Do You Set Up the Strategy in TradingView?
Paste the PineScript v6 code from the bottom of this post into TradingView’s Pine Editor (Alt+P), click Add to chart, then open the strategy settings panel.
Settings used for the 1,574% backtest:
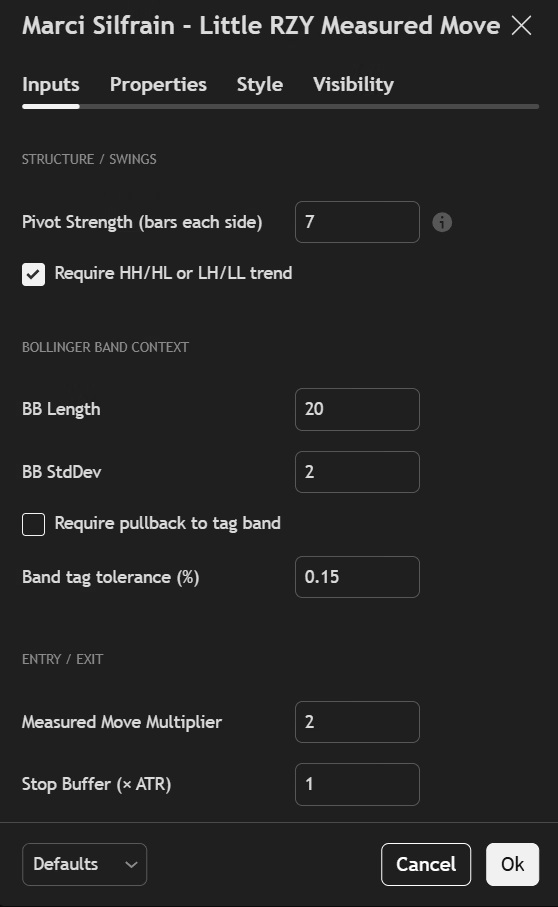
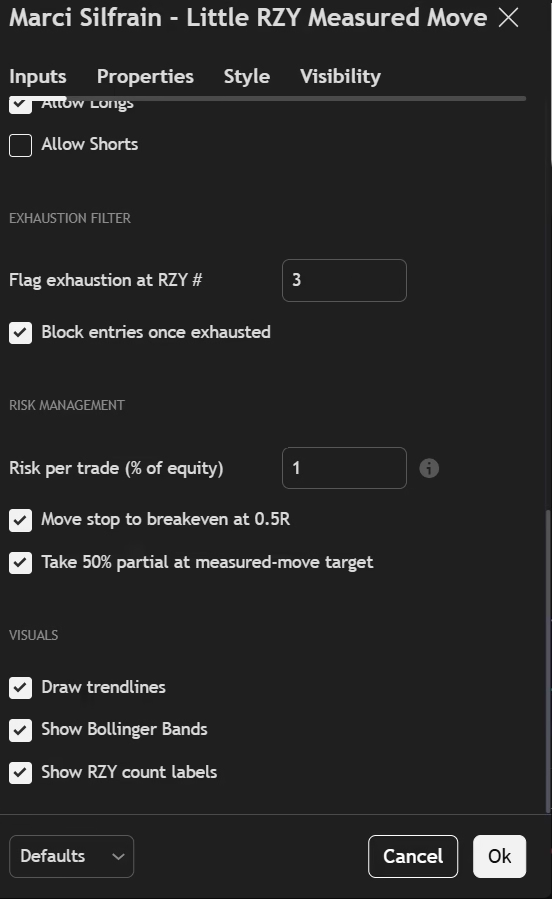
| Setting | Value (1,574% backtest) | Notes |
|---|---|---|
| Pivot Strength | 7 | Bars each side. Try 5 on 1H, 10 on Daily. |
| Require HH/HL trend | ON | Filters out sideways chop |
| Measured Move Multiplier | 2.0 | Sets runner target at 2× structure size |
| Stop Buffer | 1.0 × ATR | Extra space below trendline |
| Minimum R:R | 1.2 | Skips setups with tight targets |
| Risk per trade | 5% (or 1%) | Primary drawdown control |
| Breakeven at 0.5R | ON | Moves stop after partial fills |
| 50% partial at target | ON | Banks 50% at measured move, runs rest |
| Allow Shorts | OFF | Gold bull market — longs only |
Critical — Properties panel (not Inputs):

The Margin for long/short positions: 5% setting is not optional if you’re testing on XAUUSD, GC1!, NQ1!, or ES1!. Without it, TradingView’s backtester sees that a single gold position costs $330,000+ in notional value, determines your $100k account cannot cover it, and silently produces zero trades. Setting margin to 5% tells the engine to use 5% of notional as the margin requirement — matching how these instruments actually trade at brokers.
The PineScript’s f_qty() function handles all position sizing automatically. It reads syminfo.pointvalue — $1 for XAUUSD and most forex, $100 per point for GC futures, $20 per point for NQ, $50 for ES — and sizes the position so a full stop-out costs exactly riskPct% of current equity. It also caps position size so the required margin never exceeds available capital. You switch between instruments by changing the chart, nothing else.
What Does the Strategy Look Like on a Live Gold Chart?
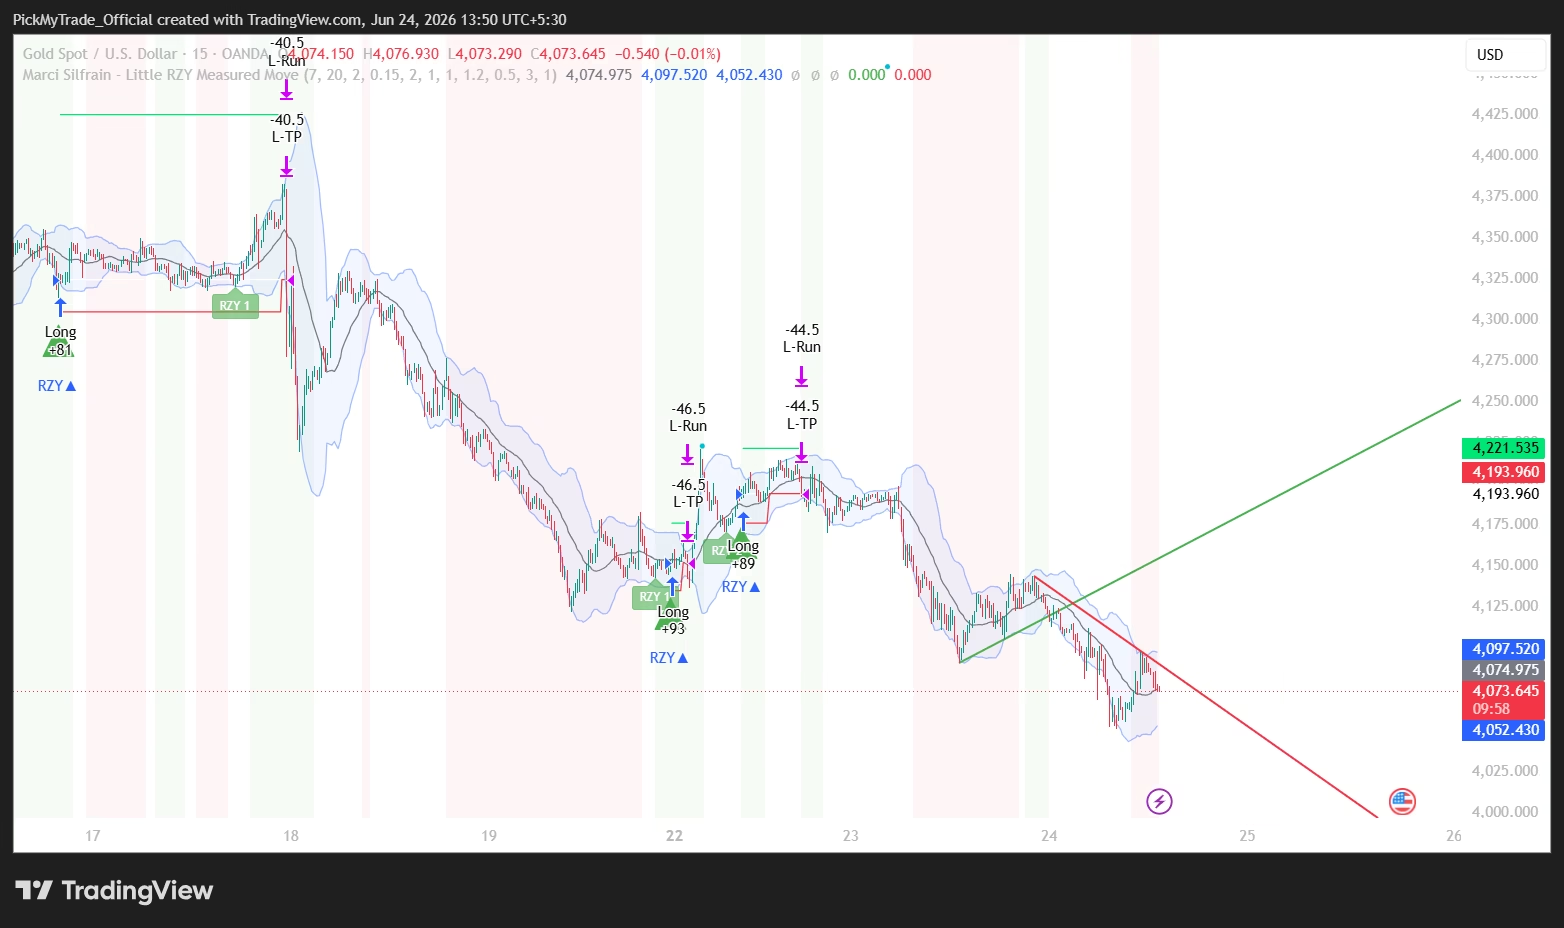
The chart above shows the strategy running on XAUUSD. The green trendline connects the last two higher lows. When price pulls back to touch the trendline and closes higher, the Marci Silfrain Strategy signal fires (triangle below the bar). The horizontal red line is the stop — placed below the trendline with an ATR buffer. The green line is the measured move target. The strategy draws these automatically on every applicable bar.
The exhaustion labels — Touch 1, Touch 2, Touch 3 — appear on the chart above each setup. Touch 1 and Touch 2 generate entries. Touch 3 gets flagged orange. Beyond 3, entries are blocked. The trend resets when a new higher-high / higher-low structure forms.
Can You Automate Marci Silfrain Strategy Signals With PickMyTrade?
The PineScript includes three built-in alert conditions. In TradingView, right-click the strategy name and create alerts for “Marci Silfrain Long,” “Marci Silfrain Short,” and “Marci Silfrain Exhaustion.”
To route those alerts to a live broker automatically, connect TradingView to PickMyTrade via webhook. PickMyTrade supports Tradovate futures (GC, NQ, ES) through pickmytrade.trade, and Binance, Bybit, and most major forex brokers through pickmytrade.io.
Standard alert message for a Tradovate long entry on GC:
{
	"symbol": "NQ",
	"strategy_name": "Marci_Silfrain_Strategy",
	"date": "{{timenow}}",
	"data": "{{strategy.order.action}}",
	"quantity": "{{strategy.order.contracts}}",
	"risk_percentage": 0,
	"price": "{{close}}",
	"tp": 0,
	"percentage_tp": 0,
	"dollar_tp": 0,
	"sl": 0,
	"dollar_sl": 0,
	"percentage_sl": 0,
	"trail": 0,
	"trail_stop": 0,
	"trail_trigger": 0,
	"trail_freq": 0,
	"update_tp": false,
	"update_sl": false,
	"breakeven": 0,
	"breakeven_offset": 0,
	"token": "",
	"pyramid": false,
	"same_direction_ignore": false,
	"reverse_order_close": false,
	"multiple_accounts": [
		{
			"token": "",
			"account_id": "abc",
			"risk_percentage": 0,
			"quantity_multiplier": 1
		},
		{
			"token": "",
			"account_id": "",
			"risk_percentage": 0,
			"quantity_multiplier": 1
		}
	]
}
For XAUUSD through a forex broker on pickmytrade.io, change "platform" to your broker name (e.g., "OANDA") and "market_type" to "forex". The quantity field can be set to 0 to let PickMyTrade use the position sizing from your account configuration.
Full setup guide: Tradovate Automation — Skip the API Fee and CME License.
Full PineScript v6 Code: Marci Silfrain Strategy
Copy the complete code below. In TradingView, press Alt+P to open Pine Editor, paste the code, click Add to chart. Then open the strategy settings (gear icon) and set the Properties tab as shown in the screenshots above — specifically Margin for long/short positions: 5%.
//@version=6
strategy('Marci Silfrain Strategy', overlay = true,
     default_qty_type  = strategy.percent_of_equity, default_qty_value = 5,
     initial_capital   = 100000,
     margin_long       = 5, margin_short = 5,
     calc_on_every_tick = false, pyramiding = 0,
     commission_type   = strategy.commission.percent, commission_value = 0.0)

// ============================================================================
// MARCI SILFRAIN — STRATEGY — MEASURED MOVE TREND
// Works on any instrument (stocks / forex / crypto / futures) and any timeframe.
// Position sizing: risks exactly riskPct% of equity per trade, capped so the
// required 5% margin never exceeds available capital.
// ============================================================================

// --- Inputs ------------------------------------------------------------------
grpStruct = 'Structure / Swings'
pivLen         = input.int(7,    'Pivot Strength (bars each side)', minval = 2, maxval = 30, group = grpStruct, tooltip = 'Higher = fewer, larger swings. Try 5 on 1H, 7 on 4H, 10 on Daily.')
useStrictTrend = input.bool(true, 'Require HH/HL or LH/LL trend', group = grpStruct)

grpBB = 'Bollinger Band Context'
bbLen       = input.int(20,    'BB Length',              minval = 5,   group = grpBB)
bbMult      = input.float(2.0, 'BB StdDev',             minval = 0.5, step = 0.1, group = grpBB)
useBBFilter = input.bool(false, 'Require pullback to tag band', group = grpBB)
bbTol       = input.float(0.15, 'Band tag tolerance (%)', minval = 0.0, step = 0.05, group = grpBB) / 100.0

grpEntry = 'Entry / Exit'
mmMult      = input.float(1.0,  'Measured Move Multiplier',        minval = 0.25, step = 0.25, group = grpEntry)
stopBufATR  = input.float(0.25, 'Stop Buffer (x ATR)',             minval = 0.0,  step = 0.05, group = grpEntry)
tlTouchATR  = input.float(1.0,  'Trendline touch window (x ATR)', minval = 0.0,  step = 0.25, group = grpEntry)
strictEntry = input.bool(false,  'Strict entry: close beyond prior bar range', group = grpEntry)
minRR       = input.float(1.2,  'Minimum R:R',                    minval = 0.5,  step = 0.25, group = grpEntry)
minATRmult  = input.float(0.5,  'Min structure size (x ATR)',      minval = 0.0,  step = 0.1,  group = grpEntry)
allowLongs  = input.bool(true,  'Allow Longs',  group = grpEntry)
allowShorts = input.bool(false, 'Allow Shorts', group = grpEntry)

grpExhaust = 'Exhaustion Filter'
exhaustCount = input.int(3,     'Flag exhaustion at Touch #', minval = 2, maxval = 8, group = grpExhaust)
blockExhaust = input.bool(true, 'Block entries once exhausted',    group = grpExhaust)

grpRisk = 'Risk Management'
riskPct    = input.float(5.0, 'Risk per trade (% of equity)', minval = 0.1, maxval = 20.0, step = 0.5, group = grpRisk,
     tooltip = 'Position sized so a stop-out costs exactly this % of equity.\nCapped automatically so margin never exceeds capital.\nWorks on stocks, forex, crypto and futures - no manual switching needed.')
useBE      = input.bool(true,  'Move stop to breakeven at 0.5R', group = grpRisk)
partialAtT = input.bool(true,  'Take 50% partial at measured-move target', group = grpRisk)

grpViz = 'Visuals'
showLines  = input.bool(true, 'Draw trendlines',       group = grpViz)
showBB     = input.bool(true, 'Show Bollinger Bands',  group = grpViz)
showLabels = input.bool(true, 'Show Touch count labels', group = grpViz)

// --- Core calculations -------------------------------------------------------
atr     = ta.atr(14)
bbBasis = ta.sma(close, bbLen)
bbDev   = bbMult * ta.stdev(close, bbLen)
bbUpper = bbBasis + bbDev
bbLower = bbBasis - bbDev

ph = ta.pivothigh(high, pivLen, pivLen)
pl = ta.pivotlow(low,  pivLen, pivLen)

var float ph1 = na
var float ph2 = na
var int   ph1b = na
var int   ph2b = na
var float pl1 = na
var float pl2 = na
var int   pl1b = na
var int   pl2b = na
var float ph2Band = na
var float pl2Band = na

if not na(ph)
    ph1     := ph2
    ph1b    := ph2b
    ph2     := ph
    ph2b    := bar_index - pivLen
    ph2Band := bbUpper[pivLen]

if not na(pl)
    pl1     := pl2
    pl1b    := pl2b
    pl2     := pl
    pl2b    := bar_index - pivLen
    pl2Band := bbLower[pivLen]

upStruct   = not na(ph1) and not na(pl1) and ph2 > ph1 and pl2 > pl1
downStruct = not na(ph1) and not na(pl1) and ph2 < ph1 and pl2 < pl1
trendUp    = useStrictTrend ? upStruct   : (not na(bbBasis) and close > bbBasis and ph2 > ph1)
trendDown  = useStrictTrend ? downStruct : (not na(bbBasis) and close < bbBasis and ph2 < ph1)

tlShortNow  = not na(ph1) and not na(ph2) and ph2b != ph1b ? ph2 + (ph2 - ph1) / (ph2b - ph1b) * (bar_index - ph2b)     : na
tlShortPrev = not na(ph1) and not na(ph2) and ph2b != ph1b ? ph2 + (ph2 - ph1) / (ph2b - ph1b) * (bar_index - 1 - ph2b) : na
tlLongNow   = not na(pl1) and not na(pl2) and pl2b != pl1b ? pl2 + (pl2 - pl1) / (pl2b - pl1b) * (bar_index - pl2b)     : na
tlLongPrev  = not na(pl1) and not na(pl2) and pl2b != pl1b ? pl2 + (pl2 - pl1) / (pl2b - pl1b) * (bar_index - 1 - pl2b) : na

var int trendDir = 0
var int rzyCount = 0
newTrendUp   = trendUp   and trendDir <= 0
newTrendDown = trendDown and trendDir >= 0

if newTrendUp
    trendDir := 1
    rzyCount := 0

if newTrendDown
    trendDir := -1
    rzyCount := 0

// --- Universal position-size function ----------------------------------------
f_qty(stopDist) =>
    pv      = math.max(syminfo.pointvalue, 0.0001)
    riskAmt = strategy.equity * riskPct / 100.0
    riskQty = math.floor(riskAmt / math.max(stopDist * pv, 0.0001))
    maxQty  = math.floor(strategy.equity / math.max(close * pv * 0.05, 0.0001))
    math.max(1, math.min(riskQty, maxQty))

// ============================================================================
// SHORT SETUP
// ============================================================================
var bool  sArmed    = false
var float sRejLevel = na
var float sRunLow   = na
var float sTLAtLow  = na
var int   sArmBar   = na

if trendDown and not na(ph) and allowShorts
    bandOK = not useBBFilter or (high[pivLen] >= ph2Band * (1 - bbTol))
    if bandOK
        sArmed    := true
        sRejLevel := ph2
        sRunLow   := low[pivLen]
        sTLAtLow  := tlShortNow
        sArmBar   := bar_index
        rzyCount  := rzyCount + 1
        if showLabels
            label.new(bar_index - pivLen, ph2, 'Touch ' + str.tostring(rzyCount),
                 style     = label.style_label_down,
                 color     = rzyCount >= exhaustCount ? color.new(color.orange, 30) : color.new(color.red, 40),
                 textcolor = color.white, size = size.small)

if sArmed
    if low < sRunLow
        sRunLow  := low
        sTLAtLow := tlShortNow

exhaustedShort = rzyCount >= exhaustCount
blockShort     = blockExhaust and exhaustedShort

sTLRef      = sArmed and not na(sTLAtLow) ? sTLAtLow : sRejLevel
sStructDist = sArmed ? sTLRef - sRunLow : 0.0
sEffStop    = sArmed ? (not na(tlShortNow) ? math.max(high, tlShortNow) : math.max(high, sRejLevel)) + atr * stopBufATR : na
sStopDist   = not na(sEffStop) ? sEffStop - close : 0.0
sTargetDist = sArmed ? close - (sRunLow - sStructDist * mmMult) : 0.0
sRROK       = sStopDist > 0 ? (sTargetDist / sStopDist >= minRR) : false
sSizeOK     = not na(atr) ? sStructDist >= atr * minATRmult : true

shortTouching  = sArmed and not na(tlShortNow) and high >= tlShortNow - atr * tlTouchATR
shortRejecting = shortTouching and (strictEntry ? close < low[1] : close < open)
shortTrigger   = shortRejecting and trendDown and not blockShort and strategy.position_size == 0 and sRROK and sSizeOK

if sArmed and not shortTrigger
    invalidShort = not na(tlShortNow) ? close > tlShortNow + atr * 0.5 : close > sRejLevel
    if invalidShort
        sArmed := false

// ============================================================================
// LONG SETUP
// ============================================================================
var bool  lArmed    = false
var float lRejLevel = na
var float lRunHigh  = na
var float lTLAtHigh = na
var int   lArmBar   = na

if trendUp and not na(pl) and allowLongs
    bandOK = not useBBFilter or (low[pivLen] <= pl2Band * (1 + bbTol))
    if bandOK
        lArmed    := true
        lRejLevel := pl2
        lRunHigh  := high[pivLen]
        lTLAtHigh := tlLongNow
        lArmBar   := bar_index
        rzyCount  := rzyCount + 1
        if showLabels
            label.new(bar_index - pivLen, pl2, 'Touch ' + str.tostring(rzyCount),
                 style     = label.style_label_up,
                 color     = rzyCount >= exhaustCount ? color.new(color.orange, 30) : color.new(color.green, 40),
                 textcolor = color.white, size = size.small)

if lArmed
    if high > lRunHigh
        lRunHigh  := high
        lTLAtHigh := tlLongNow

exhaustedLong = rzyCount >= exhaustCount
blockLong     = blockExhaust and exhaustedLong

lTLRef      = lArmed and not na(lTLAtHigh) ? lTLAtHigh : lRejLevel
lStructDist = lArmed ? lRunHigh - lTLRef : 0.0
lEffStop    = lArmed ? (not na(tlLongNow) ? math.min(low, tlLongNow) : math.min(low, lRejLevel)) - atr * stopBufATR : na
lStopDist   = not na(lEffStop) ? close - lEffStop : 0.0
lTargetDist = lArmed ? (lRunHigh + lStructDist * mmMult) - close : 0.0
lRROK       = lStopDist > 0 ? (lTargetDist / lStopDist >= minRR) : false
lSizeOK     = not na(atr) ? lStructDist >= atr * minATRmult : true

longTouching  = lArmed and not na(tlLongNow) and low <= tlLongNow + atr * tlTouchATR
longRejecting = longTouching and (strictEntry ? close > high[1] : close > open)
longTrigger   = longRejecting and trendUp and not blockLong and strategy.position_size == 0 and lRROK and lSizeOK

if lArmed and not longTrigger
    invalidLong = not na(tlLongNow) ? close < tlLongNow - atr * 0.5 : close < lRejLevel
    if invalidLong
        lArmed := false

// ============================================================================
// STRATEGY EXECUTION
// ============================================================================
var float entryPrice  = na
var float stopPrice   = na
var float targetPrice = na
var float beTrigger   = na

if shortTrigger
    entryPrice  := close
    stopPrice   := (not na(tlShortNow) ? math.max(high, tlShortNow) : math.max(high, sRejLevel)) + atr * stopBufATR
    targetPrice := sRunLow - sStructDist * mmMult
    beTrigger   := entryPrice - (entryPrice - targetPrice) * 0.5
    sArmed      := false
    strategy.entry('Short', strategy.short, qty = f_qty(stopPrice - close))

if longTrigger
    entryPrice  := close
    stopPrice   := (not na(tlLongNow) ? math.min(low, tlLongNow) : math.min(low, lRejLevel)) - atr * stopBufATR
    targetPrice := lRunHigh + lStructDist * mmMult
    beTrigger   := entryPrice + (targetPrice - entryPrice) * 0.5
    lArmed      := false
    strategy.entry('Long', strategy.long, qty = f_qty(close - stopPrice))

if useBE and strategy.position_size > 0 and not na(beTrigger)
    if high >= beTrigger
        stopPrice := math.max(stopPrice, entryPrice)

if useBE and strategy.position_size < 0 and not na(beTrigger)
    if low <= beTrigger
        stopPrice := math.min(stopPrice, entryPrice)

if strategy.position_size > 0
    if partialAtT
        strategy.exit('L-TP',  'Long', qty_percent = 50, stop = stopPrice, limit = targetPrice)
        strategy.exit('L-Run', 'Long', stop = stopPrice, limit = targetPrice + (targetPrice - entryPrice))
    else
        strategy.exit('L-X', 'Long', stop = stopPrice, limit = targetPrice)

if strategy.position_size < 0
    if partialAtT
        strategy.exit('S-TP',  'Short', qty_percent = 50, stop = stopPrice, limit = targetPrice)
        strategy.exit('S-Run', 'Short', stop = stopPrice, limit = targetPrice - (entryPrice - targetPrice))
    else
        strategy.exit('S-X', 'Short', stop = stopPrice, limit = targetPrice)

if strategy.position_size == 0 and not shortTrigger and not longTrigger
    entryPrice  := na
    stopPrice   := na
    targetPrice := na
    beTrigger   := na

// ============================================================================
// VISUALS
// ============================================================================
plot(showBB ? bbBasis : na, 'BB Basis', color = color.new(color.gray, 0))
pU = plot(showBB ? bbUpper : na, 'BB Upper', color = color.new(color.blue, 60))
pL = plot(showBB ? bbLower : na, 'BB Lower', color = color.new(color.blue, 60))
fill(pU, pL, color = showBB ? color.new(color.blue, 94) : na)

var line tlShort = na
var line tlLong  = na
if showLines and not na(ph1) and not na(ph2) and ph2 < ph1
    line.delete(tlShort)
    tlShort := line.new(ph1b, ph1, ph2b, ph2, color = color.new(color.red, 0), width = 2, extend = extend.right)
if showLines and not na(pl1) and not na(pl2) and pl2 > pl1
    line.delete(tlLong)
    tlLong := line.new(pl1b, pl1, pl2b, pl2, color = color.new(color.green, 0), width = 2, extend = extend.right)

plot(strategy.position_size != 0 ? entryPrice  : na, 'Entry',  color = color.new(color.white, 0), style = plot.style_linebr)
plot(strategy.position_size != 0 ? stopPrice   : na, 'Stop',   color = color.new(color.red,   0), style = plot.style_linebr)
plot(strategy.position_size != 0 ? targetPrice : na, 'Target', color = color.new(color.lime,  0), style = plot.style_linebr)

plotshape(longTrigger,  'Long',  shape.triangleup,   location.belowbar, color = color.new(color.green, 0), size = size.normal, text = 'MS')
plotshape(shortTrigger, 'Short', shape.triangledown, location.abovebar, color = color.new(color.red,   0), size = size.normal, text = 'MS')

bgcolor(trendUp ? color.new(color.green, 95) : trendDown ? color.new(color.red, 95) : na)

// ============================================================================
// INFO TABLE
// ============================================================================
var table t = table.new(position.top_right, 2, 6, bgcolor = color.new(color.black, 80), border_width = 1)
if barstate.islast
    table.cell(t, 0, 0, 'Marci Silfrain Strategy',  text_color = color.white,  text_size = size.small)
    table.cell(t, 1, 0, syminfo.ticker, text_color = color.yellow, text_size = size.small)
    table.cell(t, 0, 1, 'Trend',       text_color = color.gray, text_size = size.tiny)
    table.cell(t, 1, 1, trendUp ? 'UP' : trendDown ? 'DOWN' : 'SIDEWAYS',
         text_color = trendUp ? color.green : trendDown ? color.red : color.gray, text_size = size.tiny)
    table.cell(t, 0, 2, 'Touch #',       text_color = color.gray, text_size = size.tiny)
    table.cell(t, 1, 2, str.tostring(rzyCount) + (rzyCount >= exhaustCount ? ' EXHAUSTED' : ''),
         text_color = rzyCount >= exhaustCount ? color.orange : color.white, text_size = size.tiny)
    table.cell(t, 0, 3, 'Armed',       text_color = color.gray, text_size = size.tiny)
    table.cell(t, 1, 3, sArmed ? 'SHORT' : lArmed ? 'LONG' : '-',
         text_color = sArmed ? color.red : lArmed ? color.green : color.gray, text_size = size.tiny)
    table.cell(t, 0, 4, 'In Trade',    text_color = color.gray, text_size = size.tiny)
    table.cell(t, 1, 4, strategy.position_size > 0 ? 'LONG' : strategy.position_size < 0 ? 'SHORT' : 'FLAT',
         text_color = strategy.position_size > 0 ? color.green : strategy.position_size < 0 ? color.red : color.gray, text_size = size.tiny)
    table.cell(t, 0, 5, 'Target',      text_color = color.gray, text_size = size.tiny)
    table.cell(t, 1, 5, na(targetPrice) ? '-' : str.tostring(targetPrice, format.mintick),
         text_color = color.lime, text_size = size.tiny)

// ============================================================================
// ALERTS
// ============================================================================
alertcondition(longTrigger,  'Marci Silfrain Long',  'Marci Silfrain Strategy Long entry (uptrend continuation)')
alertcondition(shortTrigger, 'Marci Silfrain Short', 'Marci Silfrain Strategy Short entry (downtrend continuation)')
alertcondition(rzyCount >= exhaustCount and (newTrendUp or newTrendDown or not na(ph) or not na(pl)),
     'Marci Silfrain Exhaustion', 'Marci Silfrain Exhaustion zone reached')
Past performance does not guarantee future results. All backtest figures are simulated, use 0% commission, and reflect specific settings on a specific instrument and timeframe. The 1,574% result uses 5% risk per trade with 20× effective leverage — live trading with these settings involves substantial drawdown risk. Always test with paper trading before committing real capital. This post is for educational purposes only and does not constitute financial advice.
Start Automating Your Marci Silfrain Strategy Trades With PickMyTrade
The strategy fires TradingView alerts automatically. Connect those alerts to your live broker account through PickMyTrade and execute every Marci Silfrain Strategy entry and exit without sitting at the screen. Use pickmytrade.trade for Tradovate futures (GC, NQ, ES) and pickmytrade.io for crypto, forex, and all other brokers.
You May Also Like
- Claude AI Pine Script: Write V6 Strategies That Actually Compile — How to use AI to build and debug PineScript v6 without syntax errors or semicolons
- TradingView Screener Algos Auto-Execution 2026 — Scan markets and auto-execute from TradingView screeners into your broker
- Tradovate Automation — Skip the API Fee — Run futures automation on Tradovate without the expensive API subscription
- Vibe Coding Your TradingView Strategy — Build complete trading strategies from a plain-English description using AI
Frequently Asked Questions
What timeframe works best for Marci Silfrain Strategy on gold?
The 1,574% backtest used a shorter intraday timeframe that generated 896 trades over three years. For active management, 1H to 4H on XAUUSD balances trade frequency with setup quality. Daily timeframe produces fewer trades — 272 in the same period — but with a higher win rate (37%) and lower drawdown (18.6%). The strategy works on any timeframe without changing settings; the Pivot Strength input scales automatically to the bar size.
Does the Marci Silfrain Strategy work on GC1!, NQ1!, and ES1! futures?
Yes. The f_qty() function reads syminfo.pointvalue to adjust position sizing automatically: $100 per point for GC gold futures, $20 per point for NQ, $50 per point for ES. You must set “Margin for long positions” and “Margin for short positions” to 5% in the TradingView Properties tab. Without this, the backtester rejects all futures trades and shows “This report requires trade data” — a capital-sizing issue, not a strategy issue.
Is a 20% win rate too low to be profitable?
No. Win rate only matters in relation to the average win-to-loss ratio. The Marci Silfrain Strategy’s profit factor of 1.988 means every dollar lost returns $1.99 in winners. The partial exit at the measured-move target banks a confirmed return before the runner plays out — keeping average winner size well above average loss size even during streaks where runners fail to extend. Eight losses in a row at 5% risk each drop equity by ~34%. One runner at 4× risk (not uncommon with MM Multiplier = 2) recovers more than half of that in one trade.
How is the Marci Silfrain Strategy measured move target calculated?
The trendline is projected forward to the bar where price hit its lowest low during the current structure (the “run low”). The distance from the trendline’s value at that bar to the actual low price = the structure size. That same distance is projected below the run low to set the target. At Measured Move Multiplier 2.0, the runner target is set at 2× that distance below the run low. The PineScript calculates this on every bar automatically — you see the green target line on the chart the moment you enter.
What was the maximum drawdown on the 1,574% result?
43.57% ($274,436 from peak equity during the three-year backtest). This is a meaningful number that requires conviction in the system. At 1% risk per trade, the maximum drawdown drops to 18.62% ($23,965) — substantially more manageable. The risk percentage input is the single most important variable for controlling drawdown. Halving risk from 2% to 1% roughly halves the maximum drawdown. Doubling from 5% to 10% would roughly double both the return and the drawdown.