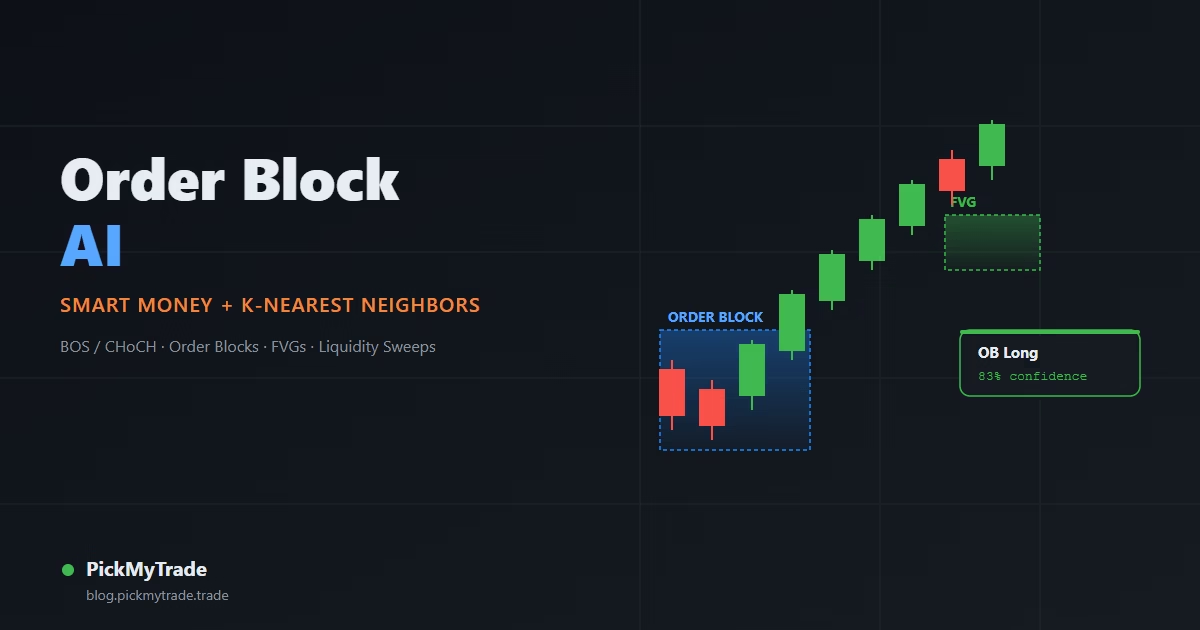
Order blocks tell you where institutions traded. They don’t tell you if the trade is any good. Order Block AI [PickMyTrade] fixes that by pairing standard smart money structure (BOS/CHoCH, order blocks, fair value gaps, liquidity sweeps) with a K-Nearest Neighbors engine that scores every setup against its own trade history before a signal ever prints.
Table of Contents
- Why Do Most Order Block Indicators Give Traders Different Answers?
- How Does Order Block AI Read Market Structure?
- How Are Order Blocks and Fair Value Gaps Detected?
- What Triggers a Setup, and Why Liquidity Sweeps Matter
- What Is the KNN Machine Learning Engine Actually Doing?
- How Does the Confidence Score Get Calculated?
- What Do the Entry, Stop-Loss and Take-Profit Levels Look Like?
- How Do You Read the Signals on the Chart?
- How Do You Automate Order Block AI Signals with PickMyTrade?
- What Are Order Block AI’s Limitations?
- Full Pine Script Source
- You May Also Like
- Frequently Asked Questions
- Does Order Block AI repaint?
- What markets and timeframes does it work on?
- Can I change the confidence threshold?
- Is this the same as ICT or standard Smart Money Concepts indicators?
- Do I need a paid TradingView plan to use it?
Key Takeaways
TradingView itself has been pushing in the same direction. Its AI Chart Copilot, which reached public beta in April 2026, was built specifically to help traders interpret setups like fair value gaps and order blocks with less guesswork. Order Block AI applies that same idea directly inside the indicator instead of a separate chat panel: the confidence score sits right next to the signal it’s scoring.
Why Do Most Order Block Indicators Give Traders Different Answers?
Order block indicators disagree with each other for a structural reason: “the last opposing candle before an impulsive move” is a rule that depends on how you define impulsive, how far back you look, and which pivot confirmed the move in the first place. Every vendor’s script answers those questions slightly differently, so every vendor’s boxes land in slightly different places.
Smart Money Concepts is one of the most-searched trading frameworks in 2026, drawing over 1,300 monthly searches for the exact phrase, but a framework that popular still produces inconsistent boxes because its core definitions depend on discretionary interpretation rather than a fixed, testable rule (Strike.Money).
One trader backtesting 2,600 SMC trades found the same pattern: the concepts hold up statistically in aggregate, but only once you strip out the subjective zone-drawing and replace it with fixed, mechanical rules (Medium). Order Block AI takes that lesson literally. Pivots are confirmed on fixed left/right bar counts, order blocks are located by a fixed lookback loop, and the only “judgment” layer left is a machine learning model that has to earn its confidence number from real historical outcomes.
How Does Order Block AI Read Market Structure?
Structure is built from ta.pivothigh and ta.pivotlow pivot detection with independently configurable left and right confirmation bars (default 10 and 10). A pivot only confirms once price has closed for i_piv_right bars past it, which means every structure shift is delayed by design. This is what keeps the script non-repainting. Once close crosses back above the last confirmed pivot high, that’s a Break of Structure (BOS) to the upside; crossing below the last confirmed pivot low is a bearish BOS.
Change of Character (CHoCH) is just a BOS that fires against the prevailing trend: a bullish BOS while the market was still in a confirmed downtrend, or the reverse. CHoCH is the structural signal that a reversal, not just a pullback, may be underway, and it carries more weight in the trigger logic than a same-direction BOS.
How Are Order Blocks and Fair Value Gaps Detected?
When a bullish BOS or CHoCH fires, the script scans back up to 10 bars looking for the most recent bearish candle (close below open), the last down-candle before the impulsive move up. That candle’s high and low become the bullish order block, drawn forward 40 bars as a box. Bearish order blocks mirror the logic off the last up-candle before a bearish BOS or CHoCH.
Fair Value Gaps (FVGs) are the classic three-candle imbalance: a bullish FVG exists when the current low sits above the high from two bars back, filtered to only count gaps larger than 10% of ATR so noise doesn’t clutter the chart. Both order blocks and FVGs are drawn as translucent boxes and can be toggled independently, or hidden entirely with Zen Mode for a clean, signals-only chart.
J. Welles Wilder’s 1978 framework for ATR, RSI, and ADX, introduced in New Concepts in Technical Trading Systems, still underpins the volatility and momentum math nearly every modern order-flow indicator relies on, Order Block AI included (StockCharts ChartSchool).
What Triggers a Setup, and Why Liquidity Sweeps Matter
A raw order block touch isn’t enough to arm a signal. The trigger requires either a CHoCH or a liquidity sweep, combined with price actually trading back into the order block zone. A liquidity sweep fires when price dips below the last confirmed pivot low and then closes back above it (or the mirror image at a pivot high), the classic stop-hunt-then-reclaim pattern.
That pattern isn’t just SMC folklore. Research on institutional currency dealing found that stop-loss and take-profit orders cluster heavily around round numbers and recent swing levels, which is exactly why price tends to spike through those levels before reversing. The cluster of resting stop orders gets triggered, adds temporary volume in the “wrong” direction, and then the move reverses once the orders are absorbed (Osler, Journal of Finance / NY Fed Staff Report). A follow-up New York Fed staff study went further, documenting how clusters of triggered stop-loss orders can cascade into short, sharp price runs before the market reabsorbs them, the exact shape of a liquidity sweep (Osler, “Stop-Loss Orders and Price Cascades in Currency Markets”). Requiring a sweep-and-reclaim before arming a signal is a direct, mechanical translation of that finding.
What Is the KNN Machine Learning Engine Actually Doing?
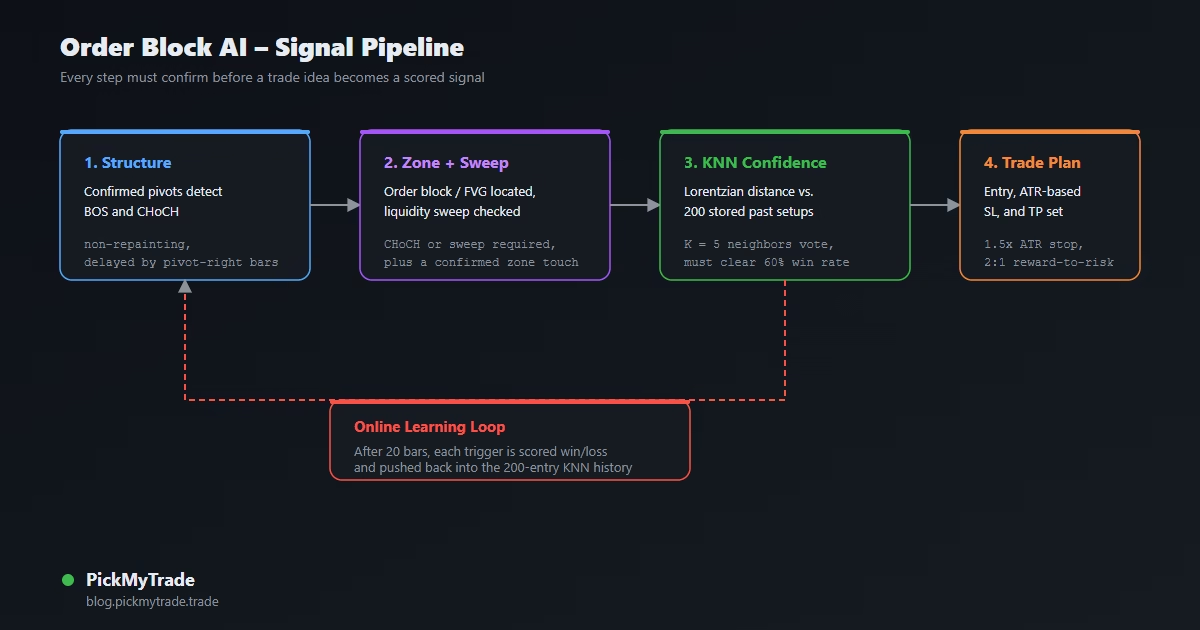
Every time a trigger condition fires, the script builds a three-feature vector from the current bar: RSI normalized to 0 to 1, a capped volume-vs-20-period-average ratio normalized to 0 to 1, and ADX capped and normalized to 0 to 1. It then compares that vector against up to 200 stored historical trigger vectors using a Lorentzian distance function: the sum of log(1 + |difference|) across all three features, rather than a straight Euclidean distance.
The Lorentzian metric compresses the influence of outliers instead of squaring them, so one abnormal volume spike doesn’t dominate the whole distance calculation. It’s the same distance function behind jdehorty’s Machine Learning: Lorentzian Classification, one of TradingView’s most-replicated open-source ML indicators, later expanded into a premium version built with more than 1,000 community beta testers. The K-Nearest Neighbors approach itself traces back to Cover and Hart’s 1967 paper establishing that classifying a new point by its nearest historical neighbors converges toward the Bayes-optimal error rate as the sample grows, the original theoretical justification for letting the closest past examples vote (Cover & Hart, IEEE Transactions on Information Theory).
How Does the Confidence Score Get Calculated?
Order Block AI finds the K closest historical vectors (default K = 5) by distance, then checks how many of those K analogues were winning trades, meaning the historical setup hit its take-profit before its stop-loss within the outcome window (default 20 bars). The confidence score is simply wins divided by K. A signal only fires if that score clears the minimum confidence input (default 0.60, or 60%); below that threshold, the setup is dropped entirely, not flagged with a lower-confidence label.
A confidence gate that suppresses low-agreement setups outright, rather than just color-coding them, is the mechanical equivalent of the backtest-first discipline that separates rule-based systems from discretionary chart-reading, the same discipline missing from most manually-drawn SMC setups (Strike.Money).
Every trigger, whether it clears the confidence bar or not, still gets tracked forward. Once 20 bars pass, the script checks whether price hit the theoretical take-profit or stop-loss first, labels that outcome, and pushes the feature vector plus its win/loss label into the rolling 200-entry training history. That’s what makes the model self-learning: it never needs an external training step, and it keeps adapting to the current instrument and timeframe bar by bar.
What Do the Entry, Stop-Loss and Take-Profit Levels Look Like?
Risk is calculated in ATR terms, not fixed points, so it scales automatically across instruments and volatility regimes. Stop-loss sits i_sl_mult times ATR (default 1.5x) beyond the signal bar’s low (longs) or high (shorts). Take-profit is calculated from that same stop distance multiplied by the R:R input (default 2.0), so a default setup risks 1.5x ATR to make 3x ATR, a 2:1 reward-to-risk ratio before the trade is ever placed.
| Parameter | Default | What It Controls |
|---|---|---|
| Pivot Left / Right Bars | 10 / 10 | Swing confirmation delay; larger values reduce noise, increase lag |
| K Neighbors | 5 | How many historical analogues vote on each new setup |
| History Length | 200 | Rolling window of stored past signals used for KNN matching |
| Min Confidence | 0.60 | Minimum win-rate agreement among K neighbors required to fire |
| Outcome Bars | 20 | Bars allowed for a historical signal to hit TP or SL before scoring |
| SL ATR Multiplier | 1.5 | Stop-loss distance from the signal bar’s high/low |
| R:R Ratio | 2.0 | Take-profit distance as a multiple of the stop-loss distance |
How Do You Read the Signals on the Chart?
A long signal prints as a blue “OB Long” label below the bar with its confidence percentage directly underneath, for example “OB Long / 80% confidence.” Shorts print the mirror in red above the bar. Structure labels (BOS/CHoCH) and the order block and FVG boxes can all be toggled independently, and Zen Mode strips every visual element down to just the confidence-scored entry labels for traders who want a clean chart with none of the underlying zone clutter. Two alert conditions, one long and one short, are built in for automation.
How Do You Automate Order Block AI Signals with PickMyTrade?
Once an alert fires, the signal is only useful if something executes on it. Connect the alert to PickMyTrade and every confidence-scored long or short prints a live order instead of a chart label you have to act on manually.
{
  "strategy_name": "Order_Block_AI",
  "symbol": "{{ticker}}",
  "date": "{{timenow}}",
  "data": "{{strategy.market_position}}",
  "quantity": 1,
  "price": "{{close}}",
  "platform": "TRADOVATE",
  "order_type": "MKT",
  "market_type": "future",
  "token": "YOUR_TOKEN",
  "reverse_order_close": true,
  "multiple_accounts": [
    {"connection_name": "TRADOVATE1"}
  ]
}
Use pickmytrade.trade for Tradovate futures and other supported brokers. Trading Tradovate futures instead? Point the same alert JSON at pickmytrade.trade and swap the platform field accordingly. No separate script, no separate account.
What Are Order Block AI’s Limitations?
The model is only as good as the outcomes it has seen. On a fresh chart or a thinly-traded symbol, the 200-entry history buffer fills slowly, so confidence scores are noisier until the model has enough resolved trades to work with, the same cold-start problem every online-learning system faces. Any historical trigger that neither hits its take-profit nor its stop-loss within the 20-bar outcome window gets scored as a loss by default, which can bias the training set pessimistically in slow, choppy conditions where moves simply take longer to develop than the window allows.
The KNN engine also only sees three features: RSI, volume ratio, and ADX. It has no read on macro context, news events, or correlated markets, and a backtested win rate on historical bars is not a guarantee of forward performance. For a deeper look at why backtested confidence scores can mislead traders who don’t validate them on out-of-sample data, see our guide on walk-forward optimization.
Full Pine Script Source
The complete v6 source for Order Block AI [PickMyTrade], exactly as published on TradingView. Copy it into Pine Editor, or just add the indicator directly from the TradingView script page.
//@version=6
indicator("Order Block AI [PickMyTrade]",
    overlay          = true,
    max_labels_count = 300,
    max_lines_count  = 200,
    max_boxes_count  = 100)

// ═══════════════════════════════════════════════════════════════
// INPUTS
// ═══════════════════════════════════════════════════════════════
var string G_STRUCT = "Market Structure"
var string G_OB     = "Order Blocks"
var string G_FVG    = "Fair Value Gaps"
var string G_KNN    = "KNN · ML Engine"
var string G_RISK   = "Risk Management"
var string G_DISP   = "Display"

i_piv_left   = input.int  (10,    "Pivot Left Bars",    minval=3,  maxval=50,  group=G_STRUCT, tooltip="Left confirmation bars for swing high/low detection")
i_piv_right  = input.int  (10,    "Pivot Right Bars",   minval=3,  maxval=50,  group=G_STRUCT, tooltip="Right confirmation bars — signal is delayed by this many bars (non-repainting)")
i_show_ob    = input.bool (true,  "Show Order Blocks",              group=G_OB)
i_ob_bull_c  = input.color(color.new(#2196F3, 80), "Bull OB",      group=G_OB)
i_ob_bear_c  = input.color(color.new(#FF5252, 80), "Bear OB",      group=G_OB)
i_show_fvg   = input.bool (true,  "Show Fair Value Gaps",           group=G_FVG)
i_fvg_bull_c = input.color(color.new(#26A69A, 80), "Bull FVG",     group=G_FVG)
i_fvg_bear_c = input.color(color.new(#EF5350, 80), "Bear FVG",     group=G_FVG)
i_k          = input.int  (5,     "K Neighbors",        minval=3,  maxval=15,  group=G_KNN, tooltip="Number of nearest historical analogues to vote on the signal")
i_knn_len    = input.int  (200,   "History Length",     minval=50, maxval=500, group=G_KNN, tooltip="Maximum past signals stored for KNN learning")
i_conf_min   = input.float(0.60,  "Min Confidence",     minval=0.5, maxval=1.0, step=0.05,  group=G_KNN, tooltip="Minimum fraction of K neighbors that must agree to trigger an entry")
i_out_bars   = input.int  (20,    "Outcome Bars",       minval=5,  maxval=50,  group=G_KNN, tooltip="Bars after a historical signal to evaluate its outcome (TP reached = success)")
i_sl_mult    = input.float(1.5,   "SL ATR Multiplier",  minval=0.5, maxval=5.0, step=0.25, group=G_RISK)
i_rr         = input.float(2.0,   "R:R Ratio",          minval=1.0, maxval=10.0, step=0.5, group=G_RISK, tooltip="Take profit = SL distance × R:R")
i_zen        = input.bool (false, "Zen Mode",                        group=G_DISP, tooltip="Hide all visuals except entry signal labels")
i_show_str   = input.bool (true,  "Show Structure Labels",           group=G_DISP)

// ═══════════════════════════════════════════════════════════════
// BASE CALCULATIONS
// ═══════════════════════════════════════════════════════════════
_atr       = ta.atr(14)
_rsi       = ta.rsi(close, 14)
_vol_avg   = ta.sma(volume, 20)
_vol_ratio = volume / (_vol_avg + 1e-10)

_tr   = math.max(high - low, math.abs(high - close[1]), math.abs(low - close[1]))
_dmp  = high - high[1] > low[1] - low ? math.max(high - high[1], 0.0) : 0.0
_dmm  = low[1] - low > high - high[1] ? math.max(low[1] - low, 0.0) : 0.0
_atr14 = ta.rma(_tr, 14)
_dip  = ta.rma(_dmp, 14) / (_atr14 + 1e-10) * 100
_dim  = ta.rma(_dmm, 14) / (_atr14 + 1e-10) * 100
_dx   = math.abs(_dip - _dim) / (_dip + _dim + 1e-10) * 100
_adx  = ta.rma(_dx, 14)

// ═══════════════════════════════════════════════════════════════
// MARKET STRUCTURE — Pivots, BOS, CHoCH
// ═══════════════════════════════════════════════════════════════
_ph = ta.pivothigh(high, i_piv_left, i_piv_right)
_pl = ta.pivotlow (low,  i_piv_left, i_piv_right)

var float last_ph    = na
var float last_pl    = na
var bool  in_uptrend = false
var bool  in_dntrend = false

ph_confirmed = not na(_ph)
pl_confirmed = not na(_pl)

if ph_confirmed
    last_ph := _ph
if pl_confirmed
    last_pl := _pl

_cross_bull = ta.crossover (close, last_ph)
_cross_bear = ta.crossunder(close, last_pl)
bos_bull  = not na(last_ph) and _cross_bull
bos_bear  = not na(last_pl) and _cross_bear

choch_bull = bos_bull and in_dntrend
choch_bear = bos_bear and in_uptrend

if bos_bull
    in_uptrend := true
    in_dntrend := false
if bos_bear
    in_dntrend := true
    in_uptrend := false

if i_show_str and not i_zen
    if choch_bull
        label.new(bar_index, low - _atr * 1.2, "CHoCH ▲",
            color=color.new(#26A69A,65), textcolor=#26A69A,
            style=label.style_label_up, size=size.tiny)
    else if bos_bull
        label.new(bar_index, low - _atr * 0.6, "BOS",
            color=color.new(#26A69A,80), textcolor=#26A69A,
            style=label.style_label_up, size=size.tiny)
    if choch_bear
        label.new(bar_index, high + _atr * 1.2, "CHoCH ▼",
            color=color.new(#EF5350,65), textcolor=#EF5350,
            style=label.style_label_down, size=size.tiny)
    else if bos_bear
        label.new(bar_index, high + _atr * 0.6, "BOS",
            color=color.new(#EF5350,80), textcolor=#EF5350,
            style=label.style_label_down, size=size.tiny)

// ═══════════════════════════════════════════════════════════════
// ORDER BLOCKS
// ═══════════════════════════════════════════════════════════════
var float ob_bull_hi = na
var float ob_bull_lo = na
var float ob_bear_hi = na
var float ob_bear_lo = na
var box   ob_bull_bx = na
var box   ob_bear_bx = na

if bos_bull or choch_bull
    for i = 1 to 10
        if close[i] < open[i]
            ob_bull_hi := high[i]
            ob_bull_lo := low[i]
            break
    if i_show_ob and not i_zen and not na(ob_bull_hi)
        box.delete(ob_bull_bx)
        ob_bull_bx := box.new(bar_index - 1, ob_bull_hi, bar_index + 40, ob_bull_lo,
            border_color=color.new(#2196F3, 40), bgcolor=i_ob_bull_c)

if bos_bear or choch_bear
    for i = 1 to 10
        if close[i] > open[i]
            ob_bear_hi := high[i]
            ob_bear_lo := low[i]
            break
    if i_show_ob and not i_zen and not na(ob_bear_hi)
        box.delete(ob_bear_bx)
        ob_bear_bx := box.new(bar_index - 1, ob_bear_hi, bar_index + 40, ob_bear_lo,
            border_color=color.new(#FF5252, 40), bgcolor=i_ob_bear_c)

// ═══════════════════════════════════════════════════════════════
// FAIR VALUE GAPS
// ═══════════════════════════════════════════════════════════════
bull_fvg = low > high[2] and (low - high[2]) > _atr * 0.1
bear_fvg = high < low[2] and (low[2] - high) > _atr * 0.1

var box fvg_bull_bx = na
var box fvg_bear_bx = na

if i_show_fvg and not i_zen
    if bull_fvg
        box.delete(fvg_bull_bx)
        fvg_bull_bx := box.new(bar_index - 2, low, bar_index + 30, high[2],
            border_color=color.new(#26A69A, 50), bgcolor=i_fvg_bull_c)
    if bear_fvg
        box.delete(fvg_bear_bx)
        fvg_bear_bx := box.new(bar_index - 2, low[2], bar_index + 30, high,
            border_color=color.new(#EF5350, 50), bgcolor=i_fvg_bear_c)

// ═══════════════════════════════════════════════════════════════
// LIQUIDITY SWEEPS
// ═══════════════════════════════════════════════════════════════
sweep_bull = not na(last_pl) and low < last_pl and close > last_pl
sweep_bear = not na(last_ph) and high > last_ph and close < last_ph

// ═══════════════════════════════════════════════════════════════
// ORDER BLOCK RETEST CHECK
// ═══════════════════════════════════════════════════════════════
ob_bull_touch = not na(ob_bull_hi) and low <= ob_bull_hi and close >= ob_bull_lo - _atr * 0.5
ob_bear_touch = not na(ob_bear_lo) and high >= ob_bear_lo and close <= ob_bear_hi + _atr * 0.5

// ═══════════════════════════════════════════════════════════════
// KNN · LORENTZIAN ML ENGINE
// ═══════════════════════════════════════════════════════════════
var float[] h_f1  = array.new_float(0)
var float[] h_f2  = array.new_float(0)
var float[] h_f3  = array.new_float(0)
var int[]   h_lbl = array.new_int(0)

var int[]   p_dir   = array.new_int(0)
var int[]   p_bar   = array.new_int(0)
var float[] p_entry = array.new_float(0)
var float[] p_tp    = array.new_float(0)
var float[] p_sl    = array.new_float(0)
var float[] p_f1    = array.new_float(0)
var float[] p_f2    = array.new_float(0)
var float[] p_f3    = array.new_float(0)

if array.size(p_bar) > 0
    for i = array.size(p_bar) - 1 to 0
        if bar_index - array.get(p_bar, i) >= i_out_bars
            dir = array.get(p_dir, i)
            tp  = array.get(p_tp, i)
            sl  = array.get(p_sl, i)
            outcome = 0
            if dir == 1
                outcome := high >= tp ? 1 : (low <= sl ? -1 : 0)
            else
                outcome := low <= tp ? -1 : (high >= sl ? 1 : 0)
            result = (dir == 1 and outcome == 1) or (dir == -1 and outcome == -1) ? 1 : 0
            array.push(h_f1,  array.get(p_f1, i))
            array.push(h_f2,  array.get(p_f2, i))
            array.push(h_f3,  array.get(p_f3, i))
            array.push(h_lbl, result)
            if array.size(h_f1) > i_knn_len
                array.shift(h_f1)
                array.shift(h_f2)
                array.shift(h_f3)
                array.shift(h_lbl)
            array.remove(p_dir,   i)
            array.remove(p_bar,   i)
            array.remove(p_entry, i)
            array.remove(p_tp,    i)
            array.remove(p_sl,    i)
            array.remove(p_f1,    i)
            array.remove(p_f2,    i)
            array.remove(p_f3,    i)

cur_f1 = _rsi / 100.0
cur_f2 = math.min(_vol_ratio, 5.0) / 5.0
cur_f3 = math.min(_adx / 50.0, 1.0)

lor(a1, a2, b1, b2, c1, c2) => math.log(1.0 + math.abs(a1 - a2)) + math.log(1.0 + math.abs(b1 - b2)) + math.log(1.0 + math.abs(c1 - c2))

knn_conf() =>
    n = math.min(array.size(h_f1), array.size(h_lbl))
    if n < i_k
        0.0
    else
        tmp_d = array.copy(h_f1)
        tmp_l = array.copy(h_lbl)
        for j = 0 to n - 1
            d = lor(cur_f1, array.get(h_f1, j),
                    cur_f2, array.get(h_f2, j),
                    cur_f3, array.get(h_f3, j))
            array.set(tmp_d, j, d)
        wins  = 0
        total = 0
        for _ = 0 to math.min(i_k, n) - 1
            min_i = 0
            min_v = array.get(tmp_d, 0)
            for j = 1 to array.size(tmp_d) - 1
                if array.get(tmp_d, j) < min_v
                    min_v := array.get(tmp_d, j)
                    min_i := j
            wins  += array.get(tmp_l, min_i)
            total += 1
            array.remove(tmp_d, min_i)
            array.remove(tmp_l, min_i)
        total > 0 ? wins / total : 0.0

// ═══════════════════════════════════════════════════════════════
// SIGNAL GENERATION
// ═══════════════════════════════════════════════════════════════
bull_trigger = (choch_bull or sweep_bull) and ob_bull_touch
bear_trigger = (choch_bear or sweep_bear) and ob_bear_touch

var float _conf_long  = 0.0
var float _conf_short = 0.0

long_sig  = false
short_sig = false

if bull_trigger
    c = knn_conf()
    _conf_long := c
    long_sig   := c >= i_conf_min

if bear_trigger
    c = knn_conf()
    _conf_short := c
    short_sig   := c >= i_conf_min

if long_sig
    float _sl = low - _atr * i_sl_mult
    float _tp = low + _atr * i_sl_mult * i_rr
    array.push(p_dir,   1)
    array.push(p_bar,   bar_index)
    array.push(p_entry, close)
    array.push(p_tp,    _tp)
    array.push(p_sl,    _sl)
    array.push(p_f1,    cur_f1)
    array.push(p_f2,    cur_f2)
    array.push(p_f3,    cur_f3)

if short_sig
    float _sl = high + _atr * i_sl_mult
    float _tp = high - _atr * i_sl_mult * i_rr
    array.push(p_dir,   -1)
    array.push(p_bar,   bar_index)
    array.push(p_entry, close)
    array.push(p_tp,    _tp)
    array.push(p_sl,    _sl)
    array.push(p_f1,    cur_f1)
    array.push(p_f2,    cur_f2)
    array.push(p_f3,    cur_f3)

// ═══════════════════════════════════════════════════════════════
// SIGNAL LABELS
// ═══════════════════════════════════════════════════════════════
var label _lbl_long  = na
var label _lbl_short = na

if long_sig
    label.delete(_lbl_long)
    _lbl_long := label.new(
        x         = bar_index,
        y         = low - _atr * 3.0,
        text      = "OB Long\n" + str.tostring(math.round(_conf_long * 100)) + "% confidence",
        color     = color.new(#2196F3, 60),
        textcolor = #2196F3,
        style     = label.style_label_up,
        size      = size.small)

if short_sig
    label.delete(_lbl_short)
    _lbl_short := label.new(
        x         = bar_index,
        y         = high + _atr * 3.0,
        text      = "OB Short\n" + str.tostring(math.round(_conf_short * 100)) + "% confidence",
        color     = color.new(#FF5252, 60),
        textcolor = #FF5252,
        style     = label.style_label_down,
        size      = size.small)

// ═══════════════════════════════════════════════════════════════
// ALERTS
// ═══════════════════════════════════════════════════════════════
alertcondition(long_sig,  "OB AI Long Signal",  "Order Block AI [PickMyTrade] — Long signal triggered")
alertcondition(short_sig, "OB AI Short Signal", "Order Block AI [PickMyTrade] — Short signal triggered")
You May Also Like
- Institutional Order Flow Indicator for TradingView (Free) — A CVD-based Naive Bayes signal engine built on the same score-it-don’t-just-draw-it philosophy
- Walk-Forward Optimization: Why 90% of Backtests Fail — What actually happens when a self-learning model like this one meets out-of-sample data
- Reinforcement Learning for TradingView: A Practical Guide — A deeper dive into on-chart machine learning models beyond KNN
- Pine Script v6 + AI: Strategy Writing Guide for 2026 — How to prompt AI tools to write compiling Pine Script v6 indicators like this one
Frequently Asked Questions
Does Order Block AI repaint?
No. Pivots, order blocks, and structure shifts only confirm after i_piv_right bars have closed past the pivot, and KNN feature vectors are locked in at the moment a trigger fires. Historical signals aren’t reclassified retroactively; only their win/loss outcome label is added once the 20-bar window resolves.
What markets and timeframes does it work on?
It’s timeframe-agnostic because risk is calculated in ATR terms rather than fixed ticks or points. It works on any liquid symbol with clean OHLCV data (crypto, futures, forex, and equities), though the KNN engine needs enough historical triggers to fill its training buffer before confidence scores stabilize, which happens faster on liquid, frequently-trading instruments.
Can I change the confidence threshold?
Yes. The Min Confidence input (default 0.60) sets the minimum share of the K nearest historical neighbors that must have been winners before a signal fires. Raising it to 0.70 or 0.75 produces fewer, higher-conviction signals; lowering it produces more signals with weaker historical agreement.
Is this the same as ICT or standard Smart Money Concepts indicators?
It uses the same vocabulary (order blocks, FVGs, BOS/CHoCH, liquidity sweeps) but adds a machine learning confidence layer on top. Standard SMC indicators draw every qualifying zone; Order Block AI draws a zone and then tells you, based on the indicator’s own trade history, how often similar setups actually worked.
Do I need a paid TradingView plan to use it?
No. It runs as a standard Pine Script v6 indicator on any TradingView plan that supports custom indicators. Webhook alerts for automation with PickMyTrade require TradingView’s Pro plan or higher, same as any other alert-driven strategy.
Order Block AI [PickMyTrade] is live on TradingView. Pine Script v6.
Ready to turn confidence-scored signals into executed trades? Connect Order Block AI to pickmytrade.trade for Tradovate futures. No manual order entry, no missed signals.