
In the fast-paced world of trading, tools that enhance efficiency and profit retention are invaluable. One such tool is the Auto Trail feature on the Tradovate platform. This feature allows traders to automatically adjust their stop-loss levels as the market moves in their favour, effectively locking in profits while providing room for further price movement. In this guide, we will explore how to effectively use the Auto Trail feature, its benefits, and detailed instructions on setting it up.
Understanding the Auto Trail Feature
The Auto Trail feature is designed to help traders manage their risk by automatically adjusting their stop-loss orders. When the market moves in your favour, the Auto Trail feature kicks in, allowing you to secure profits while still giving your trades the opportunity to grow. This is particularly useful in volatile markets where prices can change rapidly.
By automatically trailing your stop-loss, you can focus on other trading opportunities without constantly monitoring your positions. This feature is especially beneficial for traders who may not be able to watch the market at all times.
Setting Up the Auto Trail Feature
Now that we understand the importance of the Auto Trail feature, let’s walk through the steps to set it up on the Tradovate platform. Follow these instructions to configure the Auto Trail settings effectively.
Accessing the ATM Settings
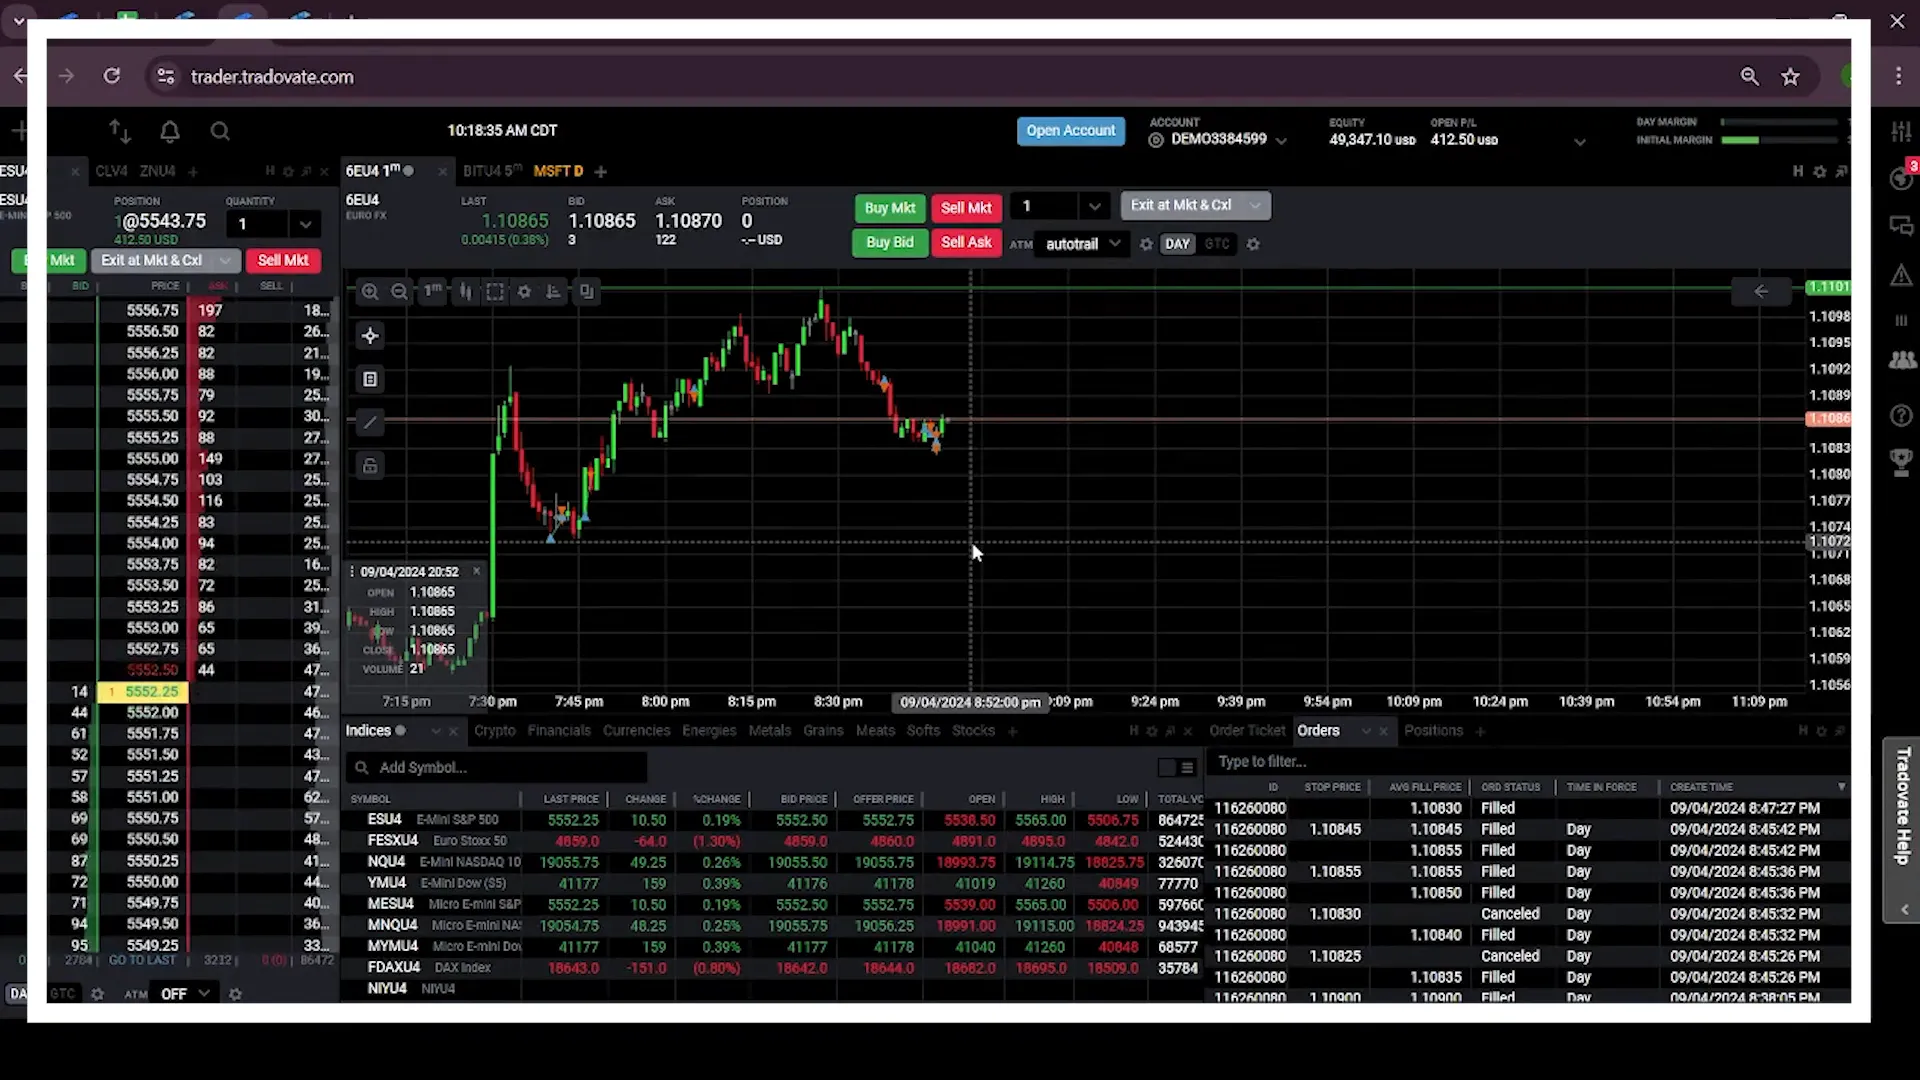
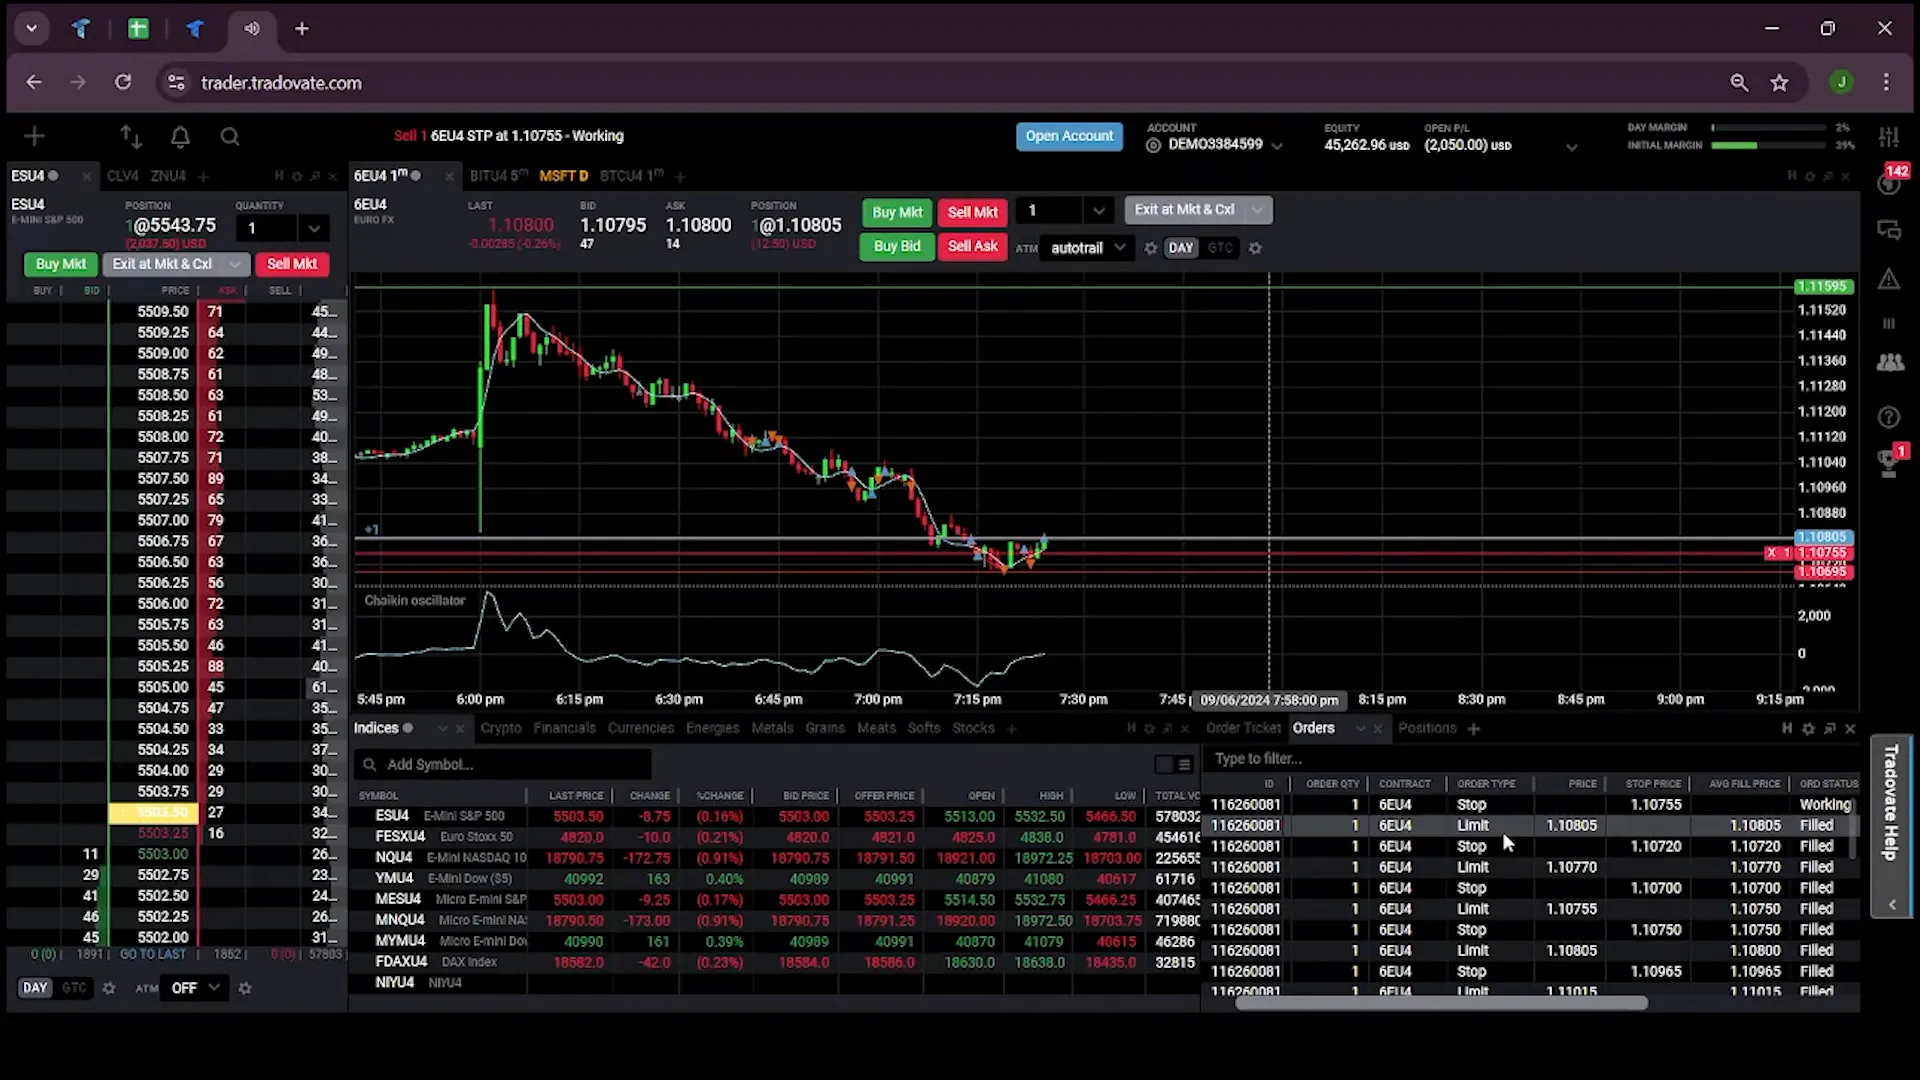
To begin, log into your Tradovate account and navigate to the dashboard. Here, you will find various trading options. Select the relevant trading instrument, for example, the Euro FX chart, to set your Auto Trail feature.
Configuring the ATM Settings
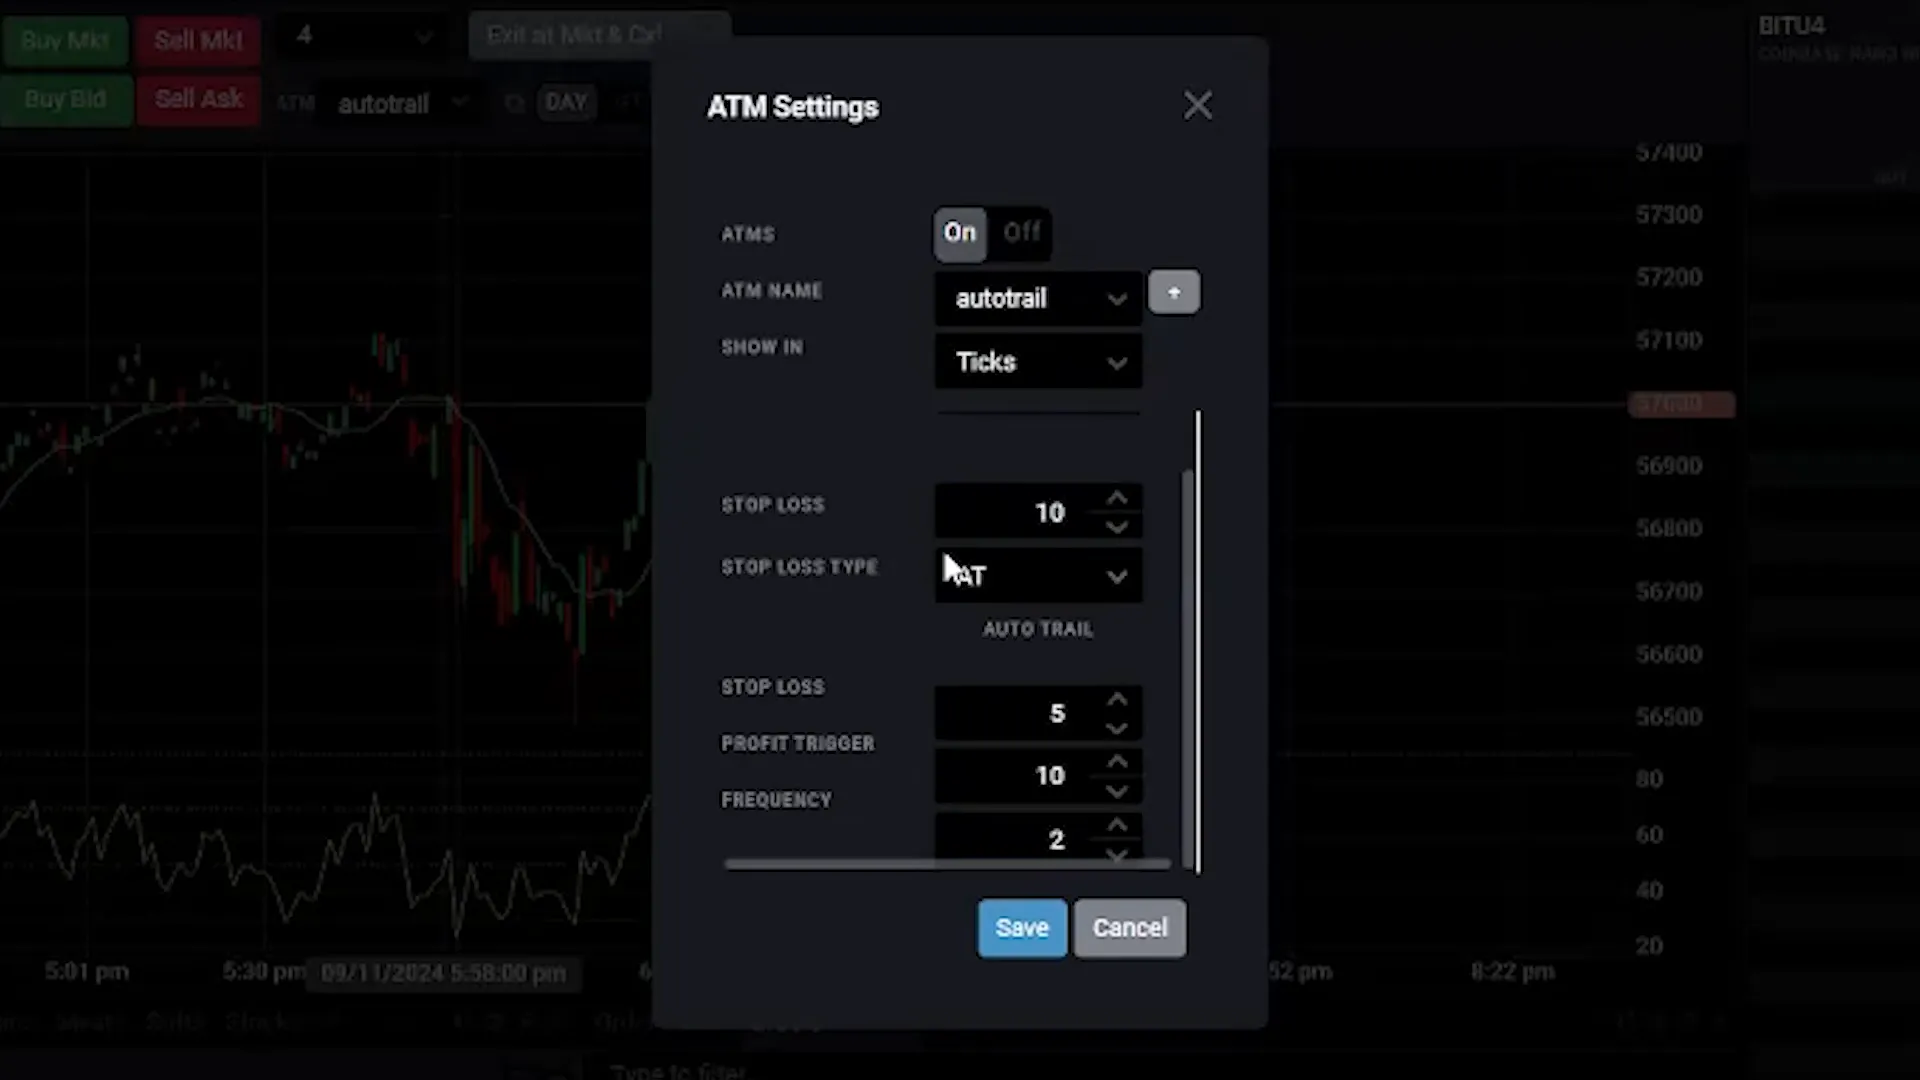
Once you have selected your trading instrument, locate the ATM (Advanced Trade Management) settings. To enable the Auto Trail feature, follow these steps:
- Turn on the ATM settings.
- Set the ATM name as “Auto Trail”.
- Choose the type as “Stop-Loss Only”.
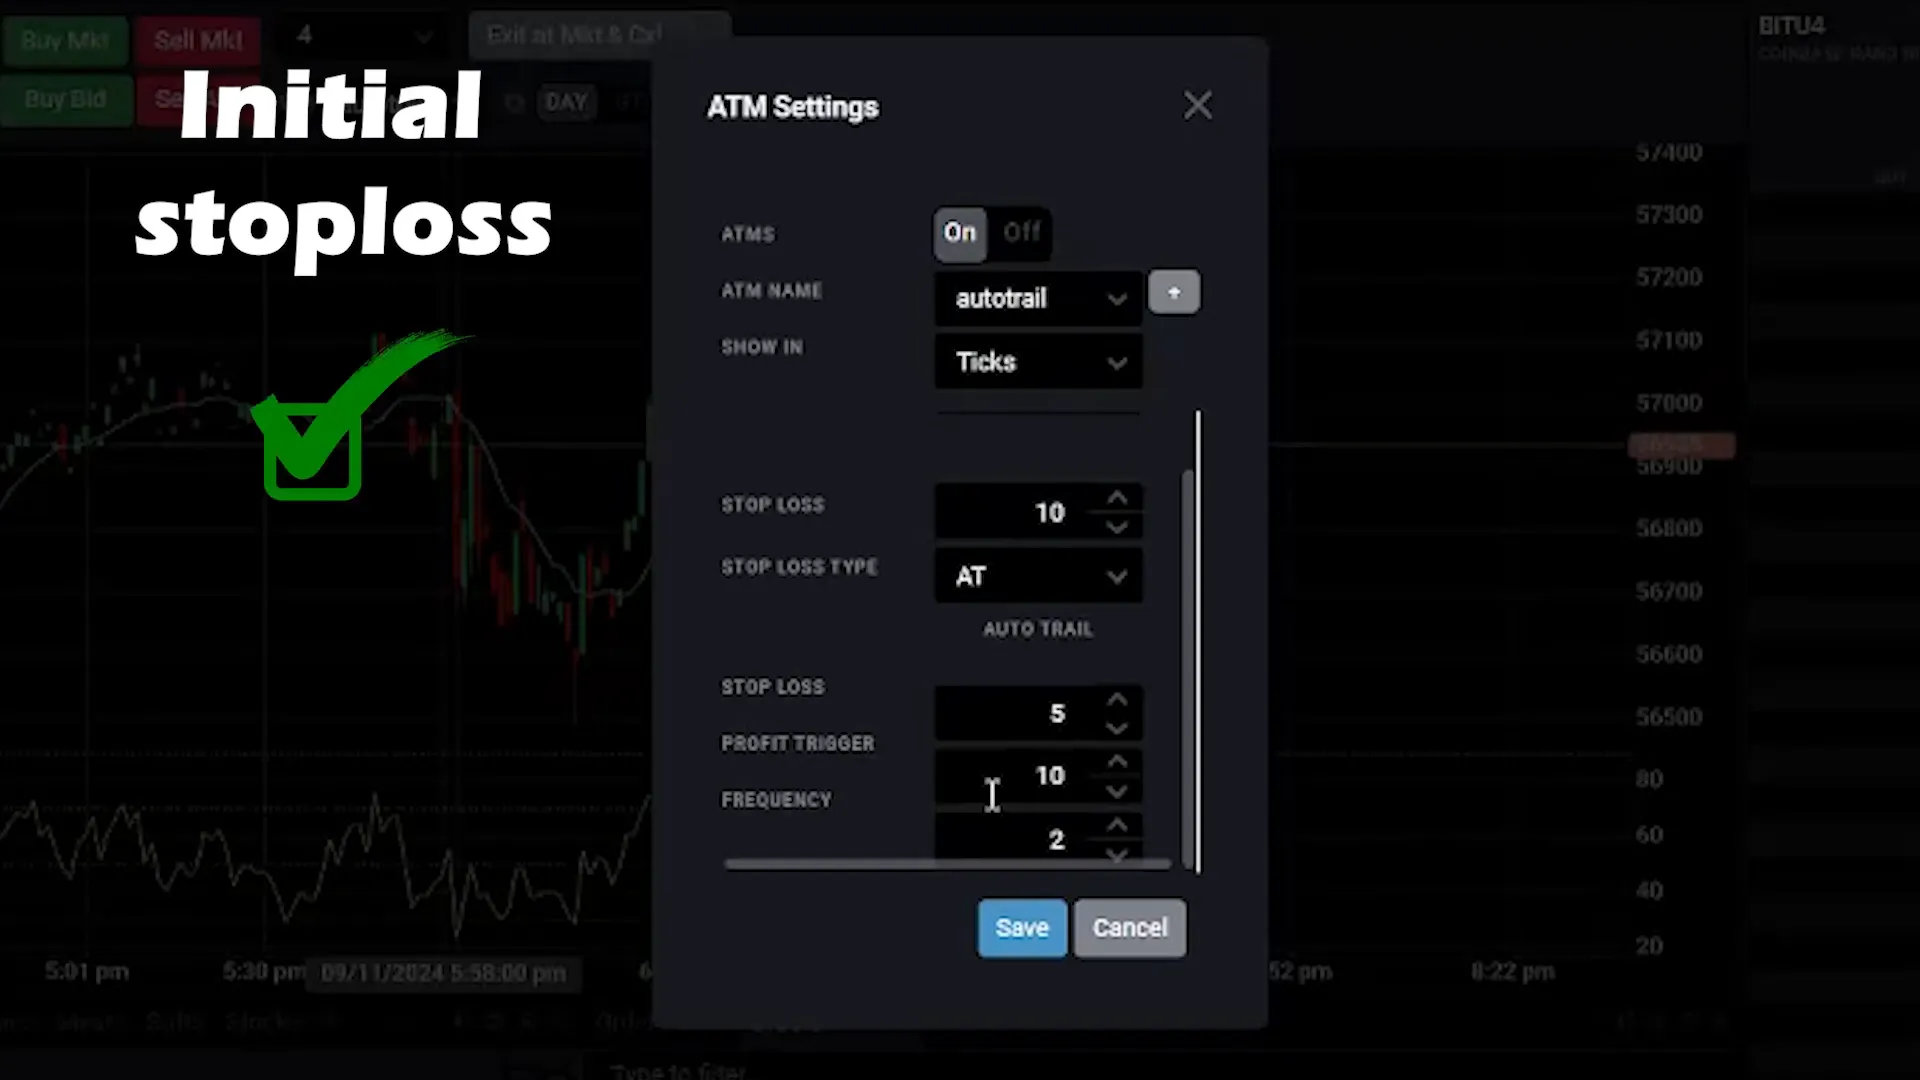
- For the initial stop-loss, set it around 10 ticks away from your entry price.
- Select “Auto Trail” for the stop-loss type.
- For the Auto Trail stop-loss, set it to 5 ticks.
- Set the profit trigger to 10 ticks.
- Keep the frequency at 2 ticks.
Understanding Stop-Loss Settings
Your initial stop-loss will be 10 ticks away from your entry price. The Auto Trail feature will activate once the market moves in your favour. Here’s how it works:
When the market price increases by 10 ticks, the Auto Trail feature will adjust your stop-loss to trail the market price by 5 ticks. This means that for every tick the market moves in your favour, your stop-loss will follow by 2 ticks. This configuration allows you to secure profits while allowing your trade to grow.
Placing Your Order
After configuring the Auto Trail settings, it’s time to place your order. Here’s how to do it:
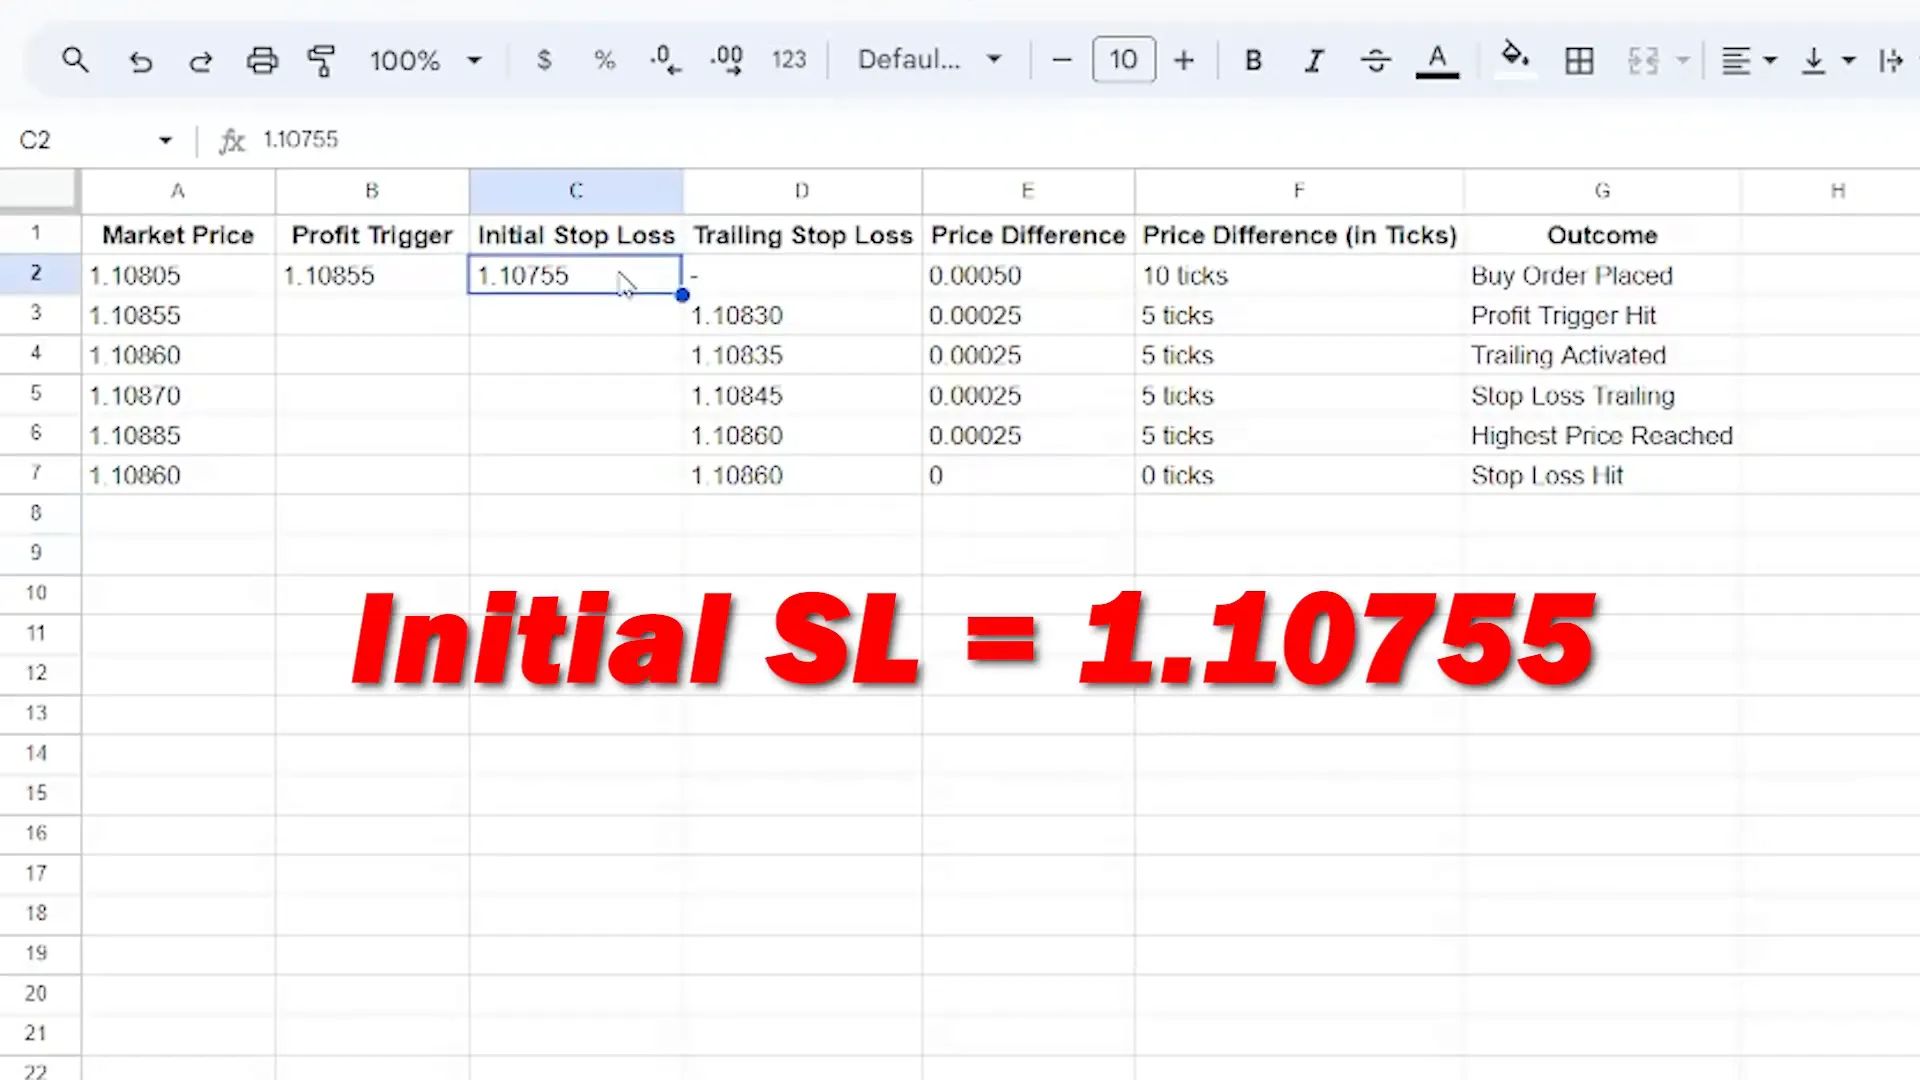
Once your order is filled, you will see your initial stop-loss set at the designated level, based on your configuration. For example, if your order is filled at 1.10805, your initial stop-loss will be set at 1.10755.
Monitoring Your Trade
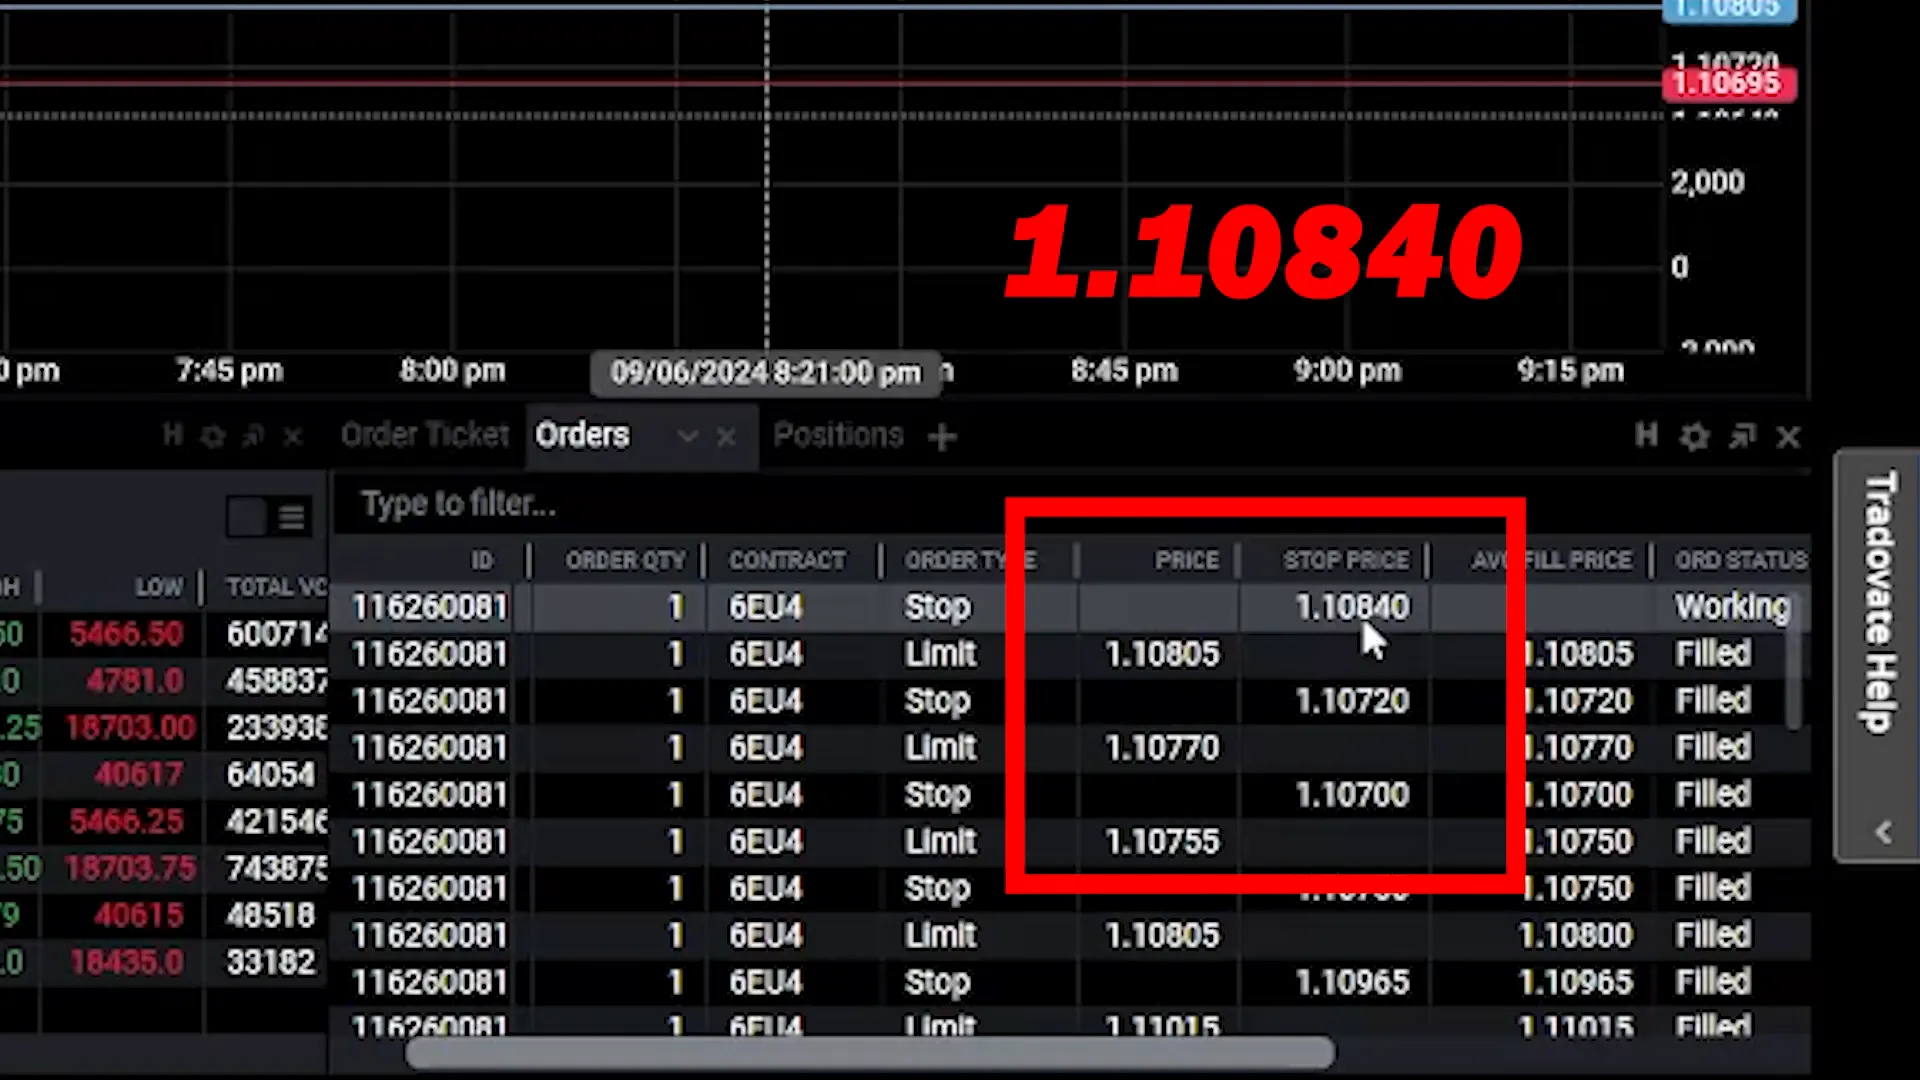
Once your order is placed, monitor the market movements. If the market moves in your favour, the Auto Trail feature will automatically adjust your stop-loss level. For instance, if the market moves to 1.10840, your stop-loss will adjust accordingly, giving you a safety net while allowing for further gains.
As the market continues to rise, your stop-loss will follow, ensuring that you lock in profits while keeping your trade open for potential further gains.
Understanding Profit Calculation
To illustrate how the Auto Trail feature works, let’s break down a sample trade:
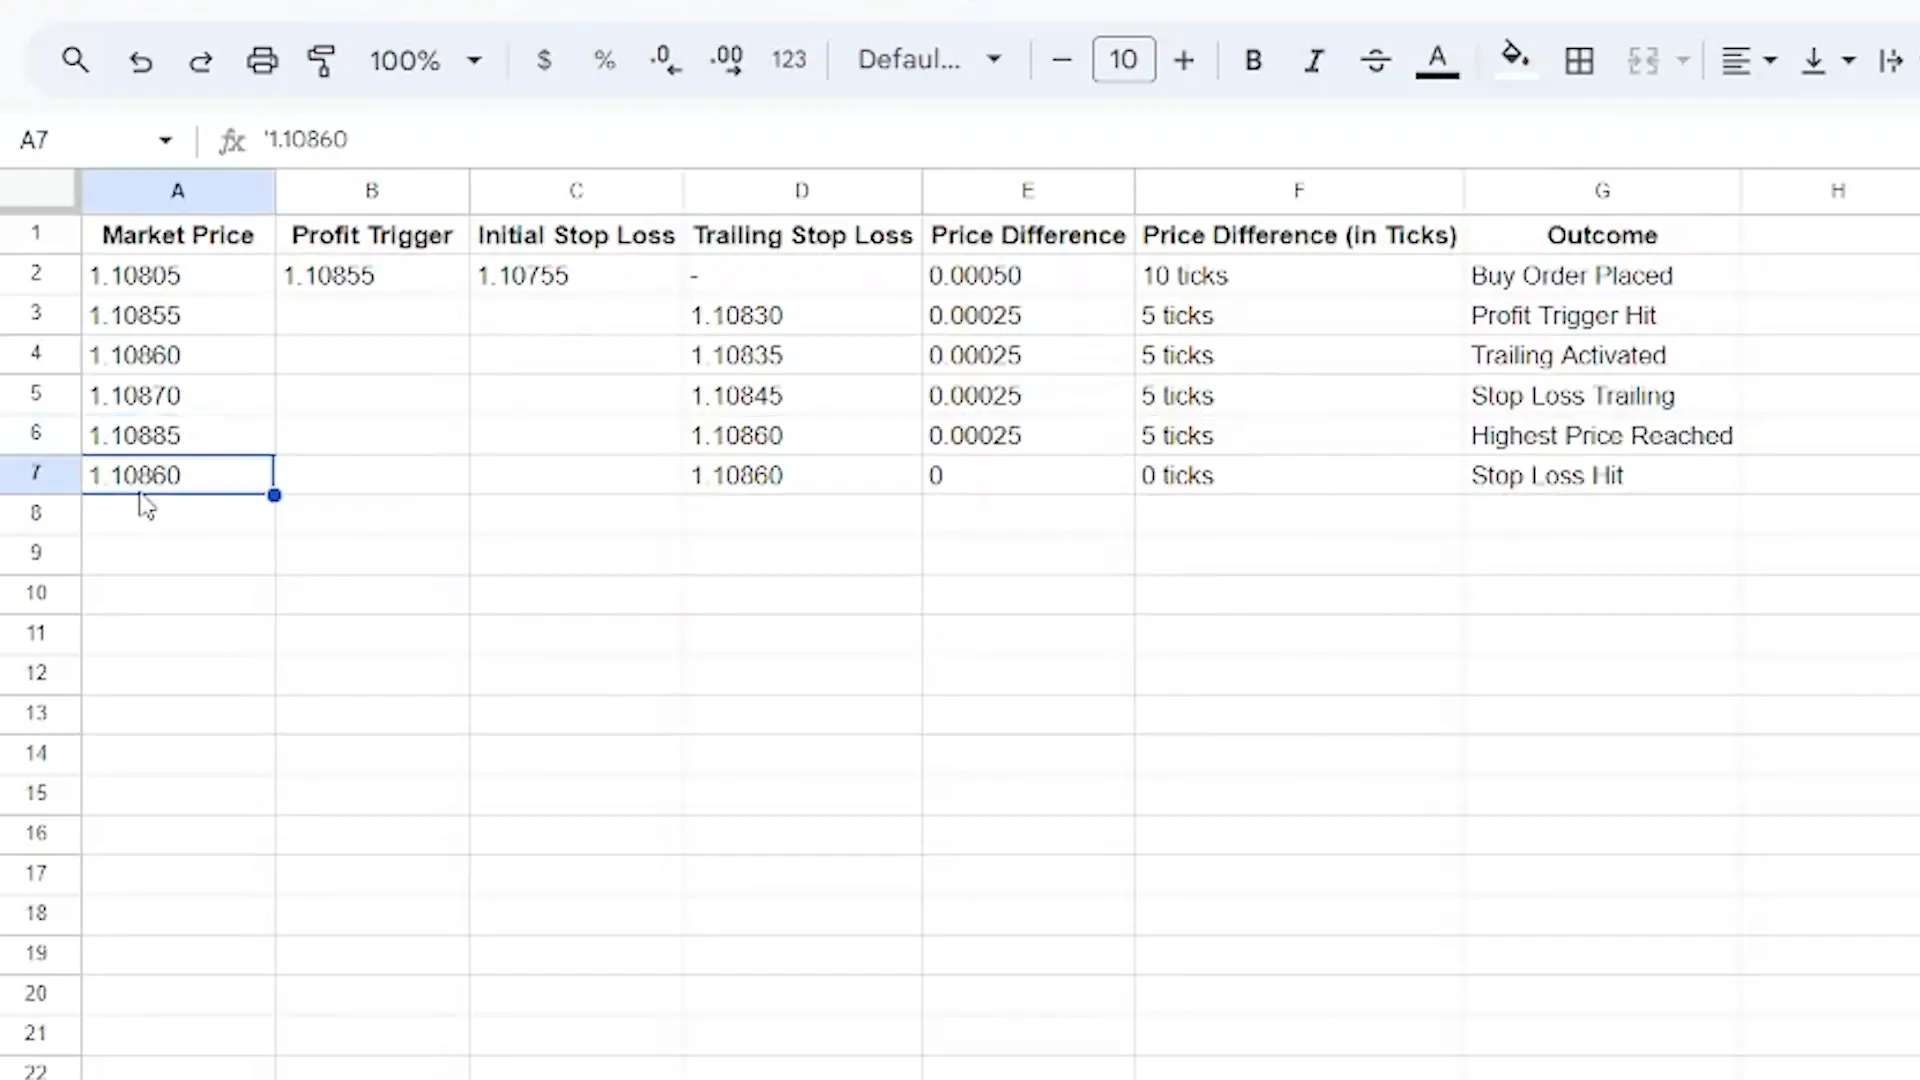
- Your initial entry price is 1.10805.
- Your initial stop-loss is set at 1.10755, which is 10 ticks below your entry price.
- Your profit target is set at 1.10855, which is 10 ticks above your entry price.
Once the market reaches your profit target, the trailing stop will activate. For instance, if the trailing stop moves from 1.10755 to 1.10830, this represents a 5-tick difference between the market price and the trailing stop.
Utilising the Auto Trail Feature Effectively
The Auto Trail feature is an excellent tool for traders looking to manage their trades more effectively. By allowing your stop-loss to automatically adjust, you can focus on new trading opportunities without the constant need to monitor existing positions.
Moreover, in fast-moving markets, this feature can significantly enhance your trading strategy by locking in profits while allowing for potential further growth. It’s an essential tool for both novice and experienced traders alike.
Conclusion
In conclusion, the Auto Trail feature on Tradovate is a powerful tool for managing trades and securing profits. By following the steps outlined in this guide, you can effectively set up and utilise this feature to enhance your trading strategy. Remember, the key to successful trading is not just about making profits but also about managing risk effectively.
If you want to explore more about automated trading and how to optimise your investments, consider checking out PickMyTrade, which offers a range of automated trading solutions.
Thanks for watching, and happy trading!
PickMyTrade
PickMyTrade specializes in automating trading bots, enabling seamless strategy execution for futures from platforms like TradingView, across well-known brokers such as Tradovate.


Mastering the Auto Trail Feature on Tradovate – PickMyTrade
cspzgdbbw http://www.gg4zwypw67j08512u6o26wtnt5y30r00s.org/
acspzgdbbw
[url=http://www.gg4zwypw67j08512u6o26wtnt5y30r00s.org/]ucspzgdbbw[/url]