In the world of trading, automation can be a game-changer. With platforms like TradingView and Tradovate, traders can streamline their processes, allowing them to focus on strategy rather than manual execution. This blog will guide you through the steps of automating alerts for TradingView indicators using PickMyTrade. Whether you are a novice or an experienced trader, understanding this process can enhance your trading efficiency.
Table of Contents
Getting Started with PickMyTrade
Ready to take your trading to the next level? Follow these simple steps to get started:
- Sign Up
- Visit PickMyTrade and register for an account. It’s quick and easy.
- Connect Your Tradovate Account
- Once registered, log in and Click on connect your Tradovate account. This integration will enable you to leverage Tradovate advanced automation tools.
- Set Up Alerts
- Click on Generate alert button , it will create a alert format copy that and paste into TradingView alert .Click on Save. These alerts will trigger automated trades based on your specified conditions.
- Enjoy Automated Trading
- Sit back and watch as your trades are executed automatically.
Understanding the Basics of Alerts
Before diving into the automation process, it’s crucial to grasp what alerts are and why they are significant. Alerts notify you when specific market conditions are met, allowing you to react promptly. In the context of TradingView, alerts can be set for various indicators, enabling traders to make informed decisions based on real-time data.
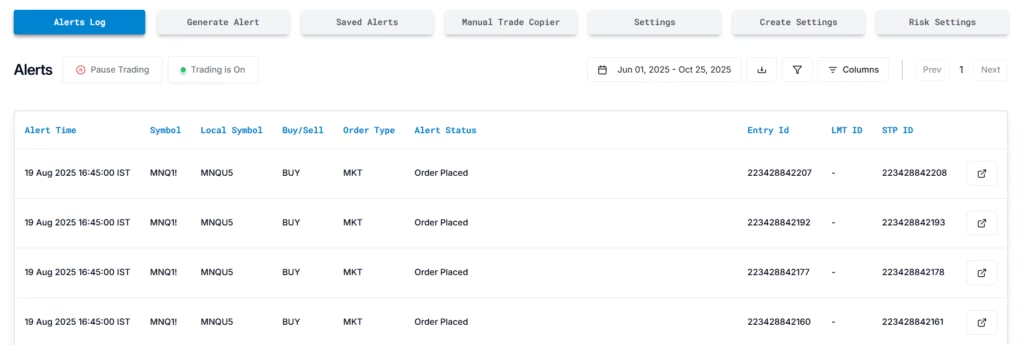
There are different types of alerts you can create: buy alerts, sell alerts, and close alerts. Each serves a distinct purpose. Buy alerts signal you to enter a position, sell alerts indicate when to exit, and close alerts help in managing existing positions effectively.
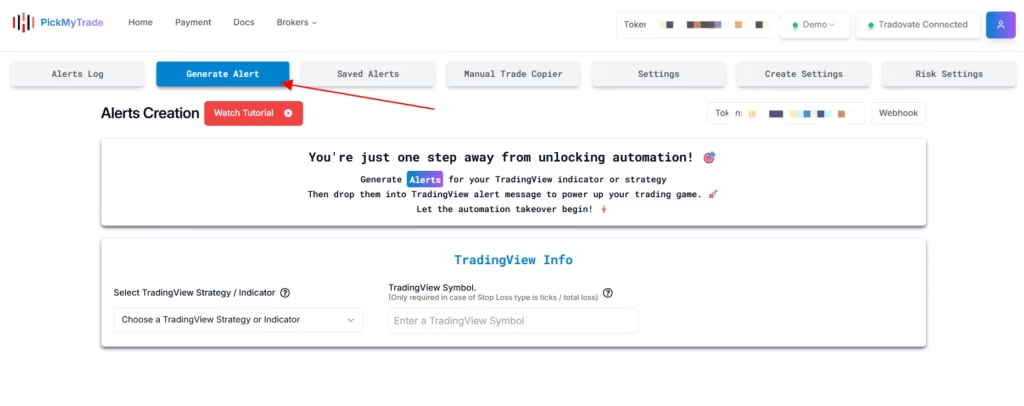
Setting Up Alerts with PickMyTrade
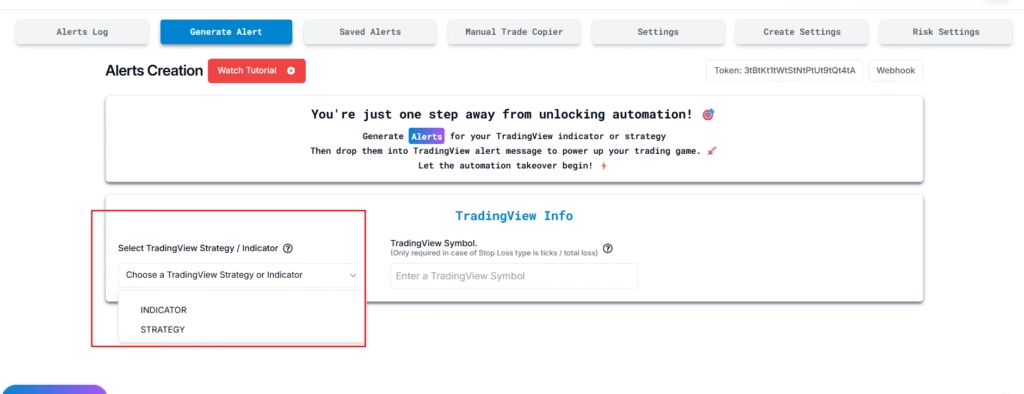
The first step in automating your TradingView indicators is to log in to PickMyTrade. This platform allows you to generate alerts seamlessly. Once logged in, navigate to the ‘Generate Alert’ section and click on ‘Indicator’ to initiate the process.
Upon selecting the indicator option, you will be prompted to choose the type of alert you want to create. This could be a buy alert, a sell alert, or a close alert. Selecting the right type is essential as it determines how the system will manage your trades.
Choosing the Right Alert Type
For instance, a buy alert is straightforward. It instructs the system to enter a position when certain conditions are met. Conversely, a close alert is crucial when you want to exit a position at a specific price point. This feature ensures that your trades are managed effectively, especially in volatile markets.
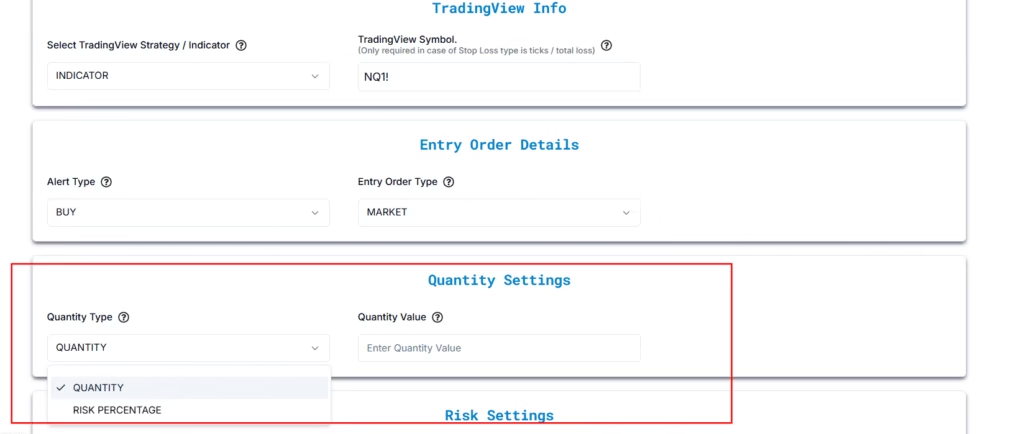
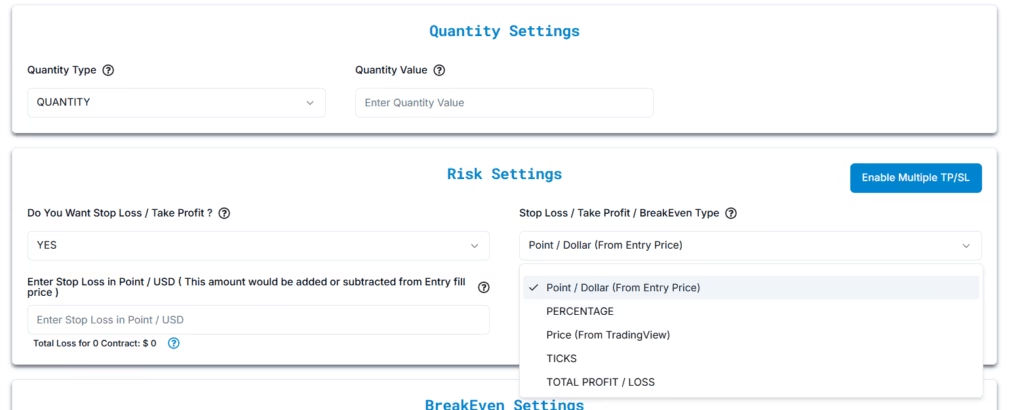
After selecting the alert type, the next step involves specifying the quantity type. You can choose between two options: quantity or risk percentage. Understanding these options is vital for effective risk management.
Understanding Quantity and Risk Percentage
When opting for quantity, you can set a specific number of contracts to trade. For example, if you choose to place one contract every time, the system will execute accordingly. On the other hand, selecting risk percentage allows you to define how much of your account you are willing to risk on each trade.
If you select risk percentage, it is mandatory to specify a stop loss. The system calculates the risk based on your entry price and the stop loss value you provide. For example, if you decide to risk 5% of your account, the system will determine the appropriate number of contracts to trade based on your account value and stop loss settings.
Setting Stop Loss and Take Profit
Setting up a stop loss is crucial for protecting your capital. PickMyTrade offers three options for stop loss: dollar, percentage, and price. Each option serves a different purpose:
- Dollar: Set a specific dollar amount for your stop loss.
- Percentage: Define your stop loss as a percentage of the entry price.
- Price: Specify an exact price for your stop loss.
When you select a stop loss type, ensure that your take profit type matches. For instance, if your stop loss is set to a dollar amount, your take profit should also be set in dollars to maintain consistency.
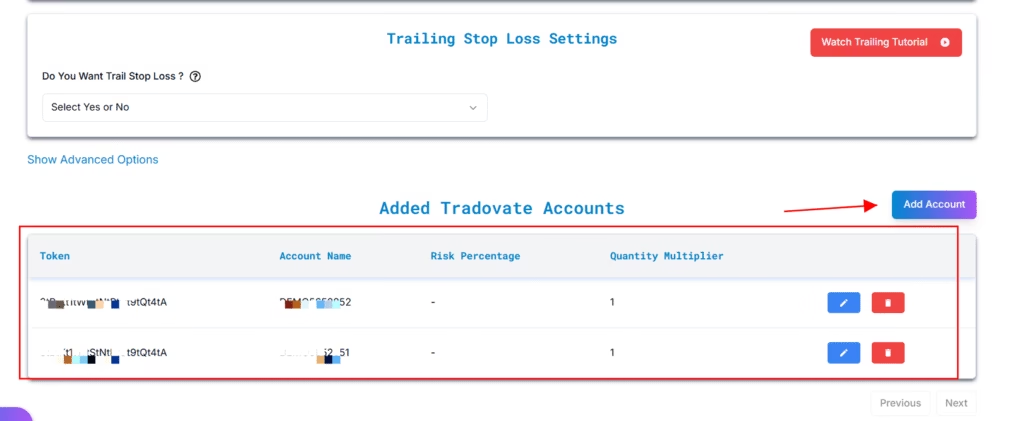
Automating Multiple Accounts
One of the significant advantages of PickMyTrade is its capability to manage multiple accounts simultaneously. This feature is particularly beneficial for traders who manage accounts for friends or clients alongside their own.
To automate multiple accounts, you need to pass each account token and name into the system. For example, if you have three accounts, you would input the token and account name for each. After linking the accounts, you can generate a single alert that automates the trades across all connected accounts.
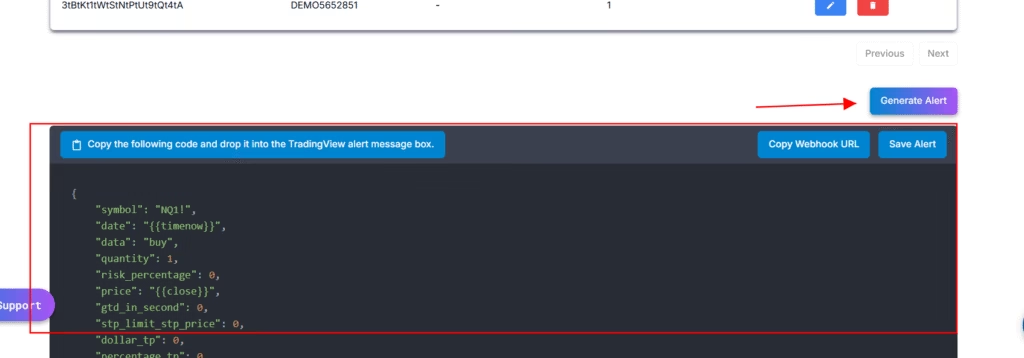
Generating Alerts
Once you have set up your alerts and linked your accounts, you can generate the alert. It’s essential to ensure that the JSON code generated is correct. If there are any errors, the system will alert you, indicating that you need to rectify the issue.
To create the alert, copy the generated code and paste it into TradingView. Make sure to enter the webhook URL from your PickMyTrade dashboard to ensure the alerts are sent correctly. This step is crucial for receiving trade notifications.
Final Thoughts
Automating your TradingView indicators using PickMyTrade can significantly enhance your trading efficiency. With the ability to set precise alerts for buy, sell, and close actions, along with managing multiple accounts, traders can focus on strategy development rather than execution.
For those looking to streamline their trading processes, consider exploring the automated trading solutions offered by PickMyTrade. This platform provides expert strategies and real-time insights, making it a valuable tool for traders in today’s fast-paced markets.
Stay tuned for more tutorials, as we will be covering how to create a trailing alert in the next video. If you have any questions, feel free to ask—I’m here to help!
You May also Like:
Unlocking the Power of Tradovate: Seamless Trading with PickMyTrade
Pingback: How to Avoid Slippage in Futures Trading with PickMyTrade - PickMyTrade
Pingback: Optimize Your Strategy with Auto Trading Bots - Pickmytrade